Air Horn Installation: You Can Definitely Hear Me Now

Motorcycle horns seem to be getting better all the time and manufacturers are putting them outside the frame and bodywork where they can be used to best effect. But most still are pretty difficult to hear much less take seriously by a driver with a phone in one ear, stereo blasting and kids screaming into the other.
The solution, an aftermarket horn. There are many options on a Gadget page in the "Easy Bolt-Ons" section of the main page. If you don't want to do any wiring and just want a horn with some authority those will be great options for you.
This page is for adding some serious decibel pounding, ear splitting sonic power that you can only get with an air horn.

 which costs about $25 and can be mounted many places on your bike. The compressor is shown (left) separated from the plastic horn housing but it comes in the package as a single unit. Many choose to mount it that way (in which case it also comes in chrome
 ). This page will show two (remote) mounting options.
Also note the install as shown is on a 1500 Vulcan where the stock horns are mounted inside the frame behind the radiator. If your bike is different then you'll have to find some alternate mounting/wiring solutions.
What You'll Need
- 1- Air Horn of your choice. They're all similar in that they come with a horn unit, a relay and a compressor.
- 18 gauge wire (preferably two colors
- At least 6 female crimp connectors (4 for the relay, 2 for the compressor)
- 1 or 2-male bullet connector(s) (if you'll be connecting to accessory wiring)
- 1-2-feet of flexible air line (more will be needed if you'll be mounting the compressor far from the horn assembly like under the left side cover)
- 2-1.25" steel hose clamps (one for compressor, one for the horn assembly if using Stebel)
- 1- 5/16ths OD hose splice as shown only needed if you separate the compressor from the plastic horn portion to connect hose to horn.


Note some of the items above assume you're installing as I've done. If you mount the compressor in another location (like under the tank between the engine "V" you may need more air line. If you use the Stebel horn and mount it as a unit you won't need any air line at all.
Wherever you mount the assembly you may want to paint the compressor black so it's hidden as well as possible.
How To Do It
- On a 1500 Vulcan, remove the left horn (remove one of your horns on any other model). You'll be using the stock horn wire to activate a relay.
- Use the horn mounting location (and stock mounting bracket bolt) to attach your relay where the horn was mounted. Note in the photo (right) I've attached a blue and a red wire to the relay to make it a little more visible.

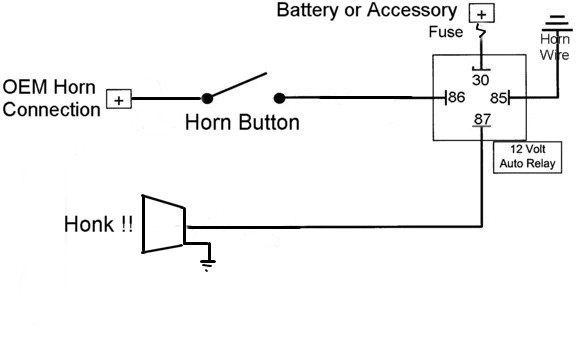
- Now we'll connect it all together using a wiring scheme identical to that shown for wiring driving lights. The exception, where there are lights shown in the diagram is your horn. The switch shown is obviously your existing horn button. Connect posts 85 and 86 of the relay to the stock horn wires.

- Connect a wire between post 87 and the positive (+) connection on your compressor.
- Connect a wire from the negative (-) side of the compressor to a good ground. You can use the frame or the negative accessory wire.
- Connect a wire between post 30 on the relay and a good 12v positive source. I used the accessory connection which is under the left front of the tank on 1500 Nomads & Classics and in the headlight bucket of 1600's. You can also connect directly to the battery if you wish.
- Mount the compressor. In this photo it's shown attached to the left side frame tubing with a 1.25" hose clamp.

Note the clamp in the photo (right) is still silver for contrast. It gets painted black like the compressor. Also note this is not the 'approved' orientation for the compressor. Stebel suggests mounting it vertically or within 25 degrees of vertical. There may be an oiling issue with the horizontal mount but many have mounted them this way with no problem.
When the clamp is tightened around the frame upright and all wires are connected this is what you'll see when kneeling down and looking up under the tank for this particular install. Note all wiring has been covered by shrink tubing or hidden from view.
Here's another alternative (right). Mount the compressor under the right side cover as Bruce Shepard has done. To make this work, and keep the compressor mounted vertically as recommended by Stebel he cut away part of what once was his tool bag holder.
- Test your work. Turn on the key, press your horn button and you should hear the compressor spool up. If nothing happens or if the compressor begins spinning before you've pressed the button then something is wrong with the wiring. If all is well move on to step 9.
- Now, mount the horn portion of your assembly. The Stebel is extremely compact. The photo at right shows it mounted to the front of the engine protector bar using another hose clamp. It's very hard to see but that's the point. I want it to be heard not seen. If you have another brand of horn mount it/them wherever the assembly pleases your eye. If you mount the horn above your front fender make sure there is plenty of clearance when the forks are completely compressed (fenders are expensive).

 Here's another option. Bruce mounted his under the bike where the pre-muffler (goat belly) once lived. He used exactly the same method of attachment as the bar mount mentioned above, slicing off some of the plastic that once captured the compressor and running a hose clamp through slots cut in the remainder of the horn bracket.
- Connect your air hose and test again. Fair warning. If you're inside a garage it's going to hurt so you might want to roll the bike outside for the test.


Overkill Time
Lucky 1500 owners have a second horn over on the right side of the bike which remains connected in this mod. It gets a little overwhelmed by the air horn tough and, since we used a relay in the horn circuit we still have plenty of capacity for.... an upgraded (louder) horn!

You can use any of the horns suggested on the other Gadget page. My choice is the FIAMM Highway Blaster, a 125decibel horn that's not much larger than the stocker. It installs easily on the right side in place of the stock horn. FIAMM makes a high tone and a low tone horn. The Stebel horn is fairly high pitched so I used the lower tone FIAMM.
The result of both horns is a MASSIVE cachaphony of sound that absolutely no motorist will be able to ignore no matter how loud the stereo, how raucous the children or how intense the cell phone conversation.


