Battery Replacement
There will come a time, probably between the second and third year of your Vulcan's life that the battery shows signs of giving up. That might include the starter turning just a little more slowly than it used to up to simply starting one day and not the next. What will you do when it happens to you? Well, if you haul the bike off to the dealer they're going to charge you $150 or more for a stock replacement battery plus probably an hour of labor. There goes $200 easy. If about $70 and a little of your time sounds better then read on. Note the following photos and description are for the FI Nomad but other 1500 Vulcans will be the same or similar. Carbed bikes have a different under seat layout and no ECU (duh)
What You'll Need
- A replacement battery.
 You have a couple of choices here. If you have a carbed Vulcan it will take a 14 amp hour battery. The direct replacement is a Yuasa YTX16-BS
(no maintenance glass mat). Fuel Injected Vulcans take an 18 amp hour battery and Yuasa has a new direct replacement available now, the YTX20CH-BS
. There are lots of battery sellers and you may have your favorite. If not check out BatterySales.com which had the best price when I needed a new battery in May of '04. At this posting BatterySales has the YTX16-BS battery for $65.08 and the high output YTX20CH-BS for $73.95 plus $10.50 shipping Florida to California). Do a Google search for those part numbers for price comparisons.
- Can of contact cleaner (optional for method "B"

- Di-Electric Grease (optional for method "
 )
)
How To Do It
- Remove your seat and you'll see your battery. Remove the hold down by removing the single screw on the forward end and hinging it back. If you have a main fuse mounted on the bracket slide it 'forward' to remove.
- Loosen and remove the 10 mm bolts holding battery cables to the battery.
- At this point you have an option. Option "A" Just pull the old battery out and replace (the way your dealer will do it) or Option "B" while you're in there get things cleaned up so you're good to go another three years.
Option "A"
 You already have the battery cables loose but that battery can be heavy and you may not have a lot of room to get a grip on it. Try this trick sent in by Sas from the Delphi Vulcan Forum.
Slip Zip Ties under each post and lift the old battery right out. You can do the same to install the new battery then snip off the ties.- Remove the square nuts from inside the old battery posts and insert them in the new battery posts. Reconnect your cables, put the battery hold down back along with your seat and you're finished.
Option "B"
This is the option that requires contact cleaner


Battery/ECU box with both removed.
ECU is at top hanging by connections
- Remove the battery. On FI bikes it's much easier to get the battery out if you first remove the ECU. With the cables removed from your battery and the ECU hanging (carefully) by its cables lift the battery out. You'll be left with a plastic box. How grungy is it in there? Any bugs? Spiders homes? Now's the time to clean everything out and start fresh.
- Pop the three connectors off the ECU and take a careful look at all the contacts. Do any of them look like this?
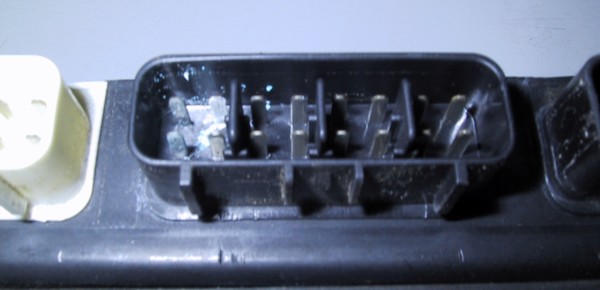 Tough to get a good photo but that is bad corrosion on the top and bottom pins second from the left. Both were coated with a green and white powdery coating. Yep, rust. A squirt of contact cleaner and (for good measure) a quick pass with a tiny Dremel wire brush cleaned everything up beautifully. Set this very expensive part aside where it won't be dropped, kicked, eaten for breakfast by the dog or hauled off to use as a shovel in the sandbox by the kids.
 - If ECU connections are dirty then what about the rest of the relay and other connectors? Well, you're already most of the way there so why not check the rest. Remove your right side cover and you'll see the fuse box mounted to the coolant overflow tank.
 Pull gently and the rubber isolators used to mount the box to the bottle will come loose. Unplug the fuse box connections and clean everything. Set the fuse box aside.

Note fuse box connectors at left  Remove two small bolts holding the overflow bottle in place and you'll see a line of relays. Lift each of the relays off its post, unplug the connector and clean connections. Note the variety of connectors Kawasaki has used. There's no way you'll be able to mix up what connector goes to what relay.
- All clean? Now get out that tube or can of Di-Electric grease and put a small amount on each male contact post (this works better than smearing the grease on the female connectors) One at a time plug things back in and hang them on the appropriate post.
- Install your new battery (don't forget Di-Electric grease on the posts). Don't connect your battery cables just yet. Let's finish playing with wires and get everything tucked safely away before applying power.
- Grab your ECU from that really safe place you put it, put some Di-Electric grease on the ECU side of the connections and re-connect to the bike. Carefully tuck the ECU back where it came from.
- Replace the battery bracket (and fuse if there was one) and side cover (hint, make sure the bottom hose is tucked between the bottle and side cover mounting screw hole or you'll never get the side cover back on).
- Using the nuts (note there's a square nut captured inside the post) and bolts from your old battery to connect your cables. Be sure and note polarity.
- Start the bike. Everything working? Great! Your electrical system is now actually better than new. Replace seat and go ride. Don't forget to dispose of the old battery properly. Most battery shops will take it from you for recycling.
Cheers
Gadget