Attach Just About Anything To Your Bike
Bracketry 101
Good news! This page isn't going to cost you a dime in materials or accessories or anything else.
One of most frequent e-mails I receive goes something like "I want to mount a (specific saddlebag, muffler, toy) but I can't find any listings for a part that will let me do that." My most frequent reply goes something like make a bracket yourself!
Brackets aren't anything mysterious, they're just pieces of material (usually metal in our case) that attach one thing to another. The most difficult thing you have to do is figure out what shape the bracket needs to be to accomplish that.
What You'll Need
Unless you have a complete CAD/CAM setup in your home and a lathe in the garage/workshop you'll be working with the simplest of tools.
- Scissors
- Electric Drill
- Maybe a hammer (rubber mallets are invaluable sometimes)
- A simple bench vise or some other way to clamp metal for bending and drilling
- Hacksaw
- Dremel Tool (one of the most versatile tools ever created)
- Black Sharpie (pen)
Getting Started

- Begin by deciding the form your bracket will have to be to accomplish whatever it is your trying to attach. The above shows a paper cutout that was a first try. Note the fold in the middle. In this case the bracket needed to be the same on both sides so it's a lot simpler to make your rough drawing then fold the paper in half and cut around 1/2 of the drawing. You've probably done this making holiday decorations. The paper was transferred to cardboard (shoeboxes are terrific for this) to test the length and assorted bends. Things were in the wrong place so a second paper template was made, transferred to cardboard and this one was just about right.
- Once you have a cardboard template (and remember this system works not just for metal but for plastic things like lowers and leather items like cup holders or tank bras) transfer to metal. Aluminum is extremely easy to work with
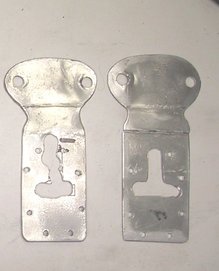
- Photo above shows cardboard template transferred to metal. Bracket on left has holes rough drilled to experiment with another bracket that attaches to this one with larger holes to check wire run through the bracket. Item on left is closer to finished product but if you look closely you'll notice the aluminum is broken. A little too much bending took its toll on this one so back to the ol' drawing board.
- Above, all finished but the polishing. Note the bolts (longer than stock) which hold the mirror/brake reservoir assemblies together. The bolt holes are good reason to make cardboard templates first because once you form the metal around another part the bolt holes will no longer line up if you just measure them and punch holes in the bracket.


All the above was done using nothing more than a Dremel cut off wheel, an electric drill, a bench vise, a rubber mallet and a couple of files.
Here's an even simpler way to go
Start with a piece of aluminum angle iron (in this case 2"x2"


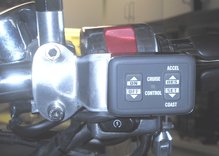
This particular bracket will hold a Kisan CG-25 electrical/temperature readout which is just over 2x2. It will be attached to the bike using the mirror post.
 |
 |
 |
Aluminum can be shined up to appear nearly as bright as chrome.The other mount you see on top of the new bracket is part of a R-A-M mounting system that allows you to attach everything from cameras to cup holders, gps units to XM radio units to your handlebars.
Another simple bracket
This is as easy as they get. Detailed on another Fixit Page (for attaching mufflers marketed for Harley Davidson's to Kawasaki's Nomad.


This is just a 1/8" thick by 1" wide piece of mild steel that you can purchase at any hardware store. Note the picture on the left includes a couple of bends necessary to make up some distance between the pipe and the bottom of a Nomad's bag/muffler support. The bracket on the right has no bend at all. Just four holes drilled in the steel.
In this case the rider probably skipped the paper template and just cut a strip of cardboard. He marked holes that needed drilling to attach the muffler and the support then, with a bench vise or some sort of ledge where he could hammer a bend into the metal made his piece. A bit of black paint and he was done.
So there you go. Nothing fancy needed, just basic hand tools and you can attach just about anything to anything else.
Cheers,
Gadget


