Boost Your Vulcan With a Caddmann Intake
Gadget Note: This is an excellent way to find out whether you really want to modify the intake of your Vulcan. You can do a modified version of this leaving the left side of your bike totally stock. You only replace the right side air box with the 9" Spectre air cleaner. You'll note increased noise levels and will quickly decide to disconnect the cold idle solenoids if you have an FI bike. Some riders decide they like the styling of the automotive air cleaner (or don't mind it much) and stick with it. Others move toward commercial offerings. It's all a matter of style. The performance whether you choose this mod or something costing hundreds of dollars will be the same.
Thanks For This Write-up and Photos from CaddmannQ
Additional Options courtesy of Raybro57;
Cold Idle Solenoid Quiet Mod by Bruce Anderson
Does a modified intake work? This is a Dyno Chart for a 2001 Nomad FI with over 50,000 miles on it
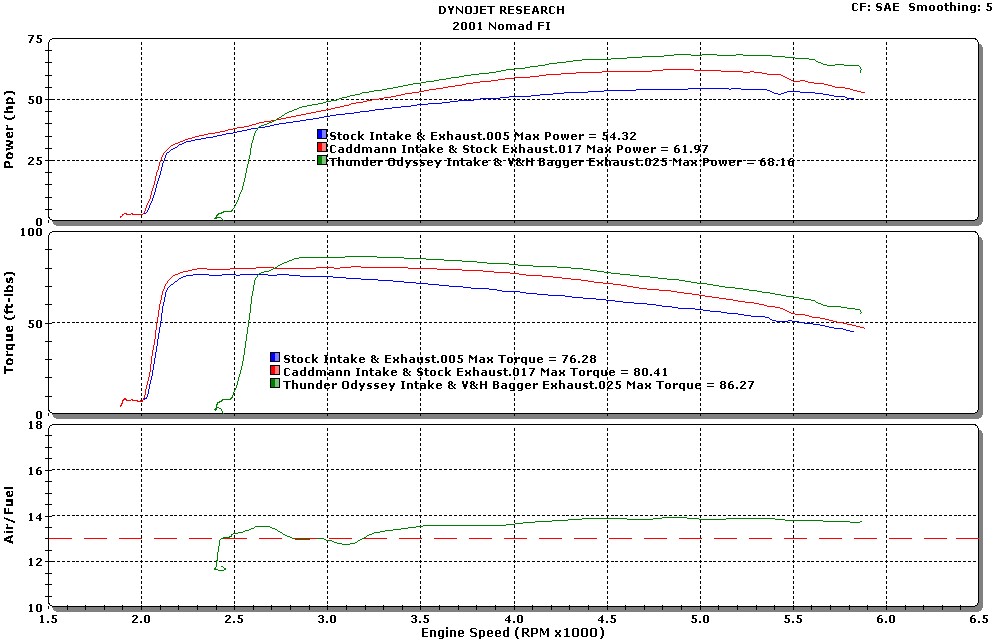
- Run 05 is stock intake and mostly stock exhaust (bypass pipe in place of goat belly)
- Run 017 is Caddmann intake and mostly stock exhaust.
- Run 025 is Thunder Odyssey Intake and V&H Bagger exhaust
Caddmann's Dual Air Filter Mod
Warning and Disclaimer: This modification violates every pollution and noise control law ever written, and may not be legally used on any public road or highway in California, the United States of America, the Land of Oz, the Planet Mars, or whatever over-regulated hellhole you might live in. That's why I designed it to be reversible in 10 minutes flat, by a trained chimp. I don't guarantee that it won't void your factory warranty, cause Ducati riders to laugh at you, give you testicular cancer (unless you are female) or cause the engine of your Vulcan to jump right out of the frame and melt down into a lumpy radioactive puddle of glowing molten pot metal. (Mine hasn't so far.)
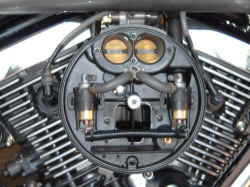
 TOP VIEW OF NOMAD WITH DUAL FILTERS
I had been painfully aware of the need for more air flow through the intake tract on my Nomad, so inspired by those famous Vulcan tweakers, Coyote and Gadget, I set out to improve matters in my own minimalist (cheap-o) sort of way.
This modification was prototyped on my 2004 Nomad FI. It should work well on all fuel injected Vulcans, as far as I know. The total cost was about $40 including both air cleaners, two bolts, two washers, and a metric tap.
What You Need:
- (2) Spectre part no. 4770 chrome high-performance 9" diameter. air cleaners available from Kragen's Auto Parts and other auto parts outlets) Note: the replacement filter part is Spectre #4805 or you can use K&N E-3527. Spectre also offers a K&N knockoff cotton fiber (oiled) filter in red #48052, blue #48056 and white #48059 available at many PepBoys stores.
- (2) 8 mm x 1.25 pitch bolts or studs at least 35 mm long (this will show up as 1.25x8x35 at the hardware store)
- (1) small sheet metal screw about 1/8" diameter. x 3/8"
- (1) marble from your kid's toy box (if you're not already "marbleized")
- an allen wrench
- a phillips screwdriver
- 10 mm socket or wrench
- a drill motor & 9/64"diameter. bit
- a hacksaw and file or grinder
- tin snips
- a small piece of tin flashing or aluminum sheet, about 18 Ga. x 3"x5"
- some silicone (or other suitable) adhesive sealant
- pencil or fine point marking pen
- a short piece of plastic wire loom or tubing
- two short plastic zip-ties
- Also either:
- (1) 8 mm x 1.25 pitch tap (plug tap preferred) & (1) 17/64" drill bit
- OR (2) 8 mm x 1.25 pitch chrome acorn nuts (Read on to see why.)
The Spectre filters are 9" diameter. with a chrome cover, similar to a Moroso (as used in the Coyote Kit), but the elements are only 1 1/2" thick, so they don't stick out as far. They also don't flow as much air, but they flow plenty, and you'll be using two if you do what I did. You won't need the ugly bottoms. Just the chrome tops, chrome wing nuts & pleated paper elements.
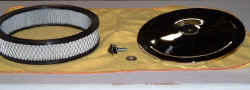 THE MAJOR PARTS: Filter, cover, washer, and modified bolt. You'll need two of each.
First remove both of the stock chrome covers & the air filter element from the bike. FI bikes only, slip off both rubber mounted idle control solenoids (ICS) from the right backing plate. Bend all four metal mounting tabs about 1/8" towards the center of the backing plate. If you're not already "marbelized" or running coasters, stuff that marble tight into the fat hose hidden behind the front ICS, then reinstall both of the solenoids. Bending the tabs provides just a small bit of clearance needed for the right filter to fit over them. You wont have to bend the tabs very much, and they bend easily by hand. Slip on the new element to check the fit.
I pulled one green wire off of each ICS to disable them. I insulated the wires by sticking them into a piece of plastic wire loom, and securing it closed with zip ties.
 ICS TABS BENT & WIRES LOOMED
Note: Disabling the solenoids is optional. At constant parade speeds the bike will run a bit better and use a bit less gas with them working, but they are really noisy. The bike won't blow up if you unplug the wires, so you can try it without risk, and easily enable them later should you so desire.
Remove two phillips-head screws, and two hex bolts that secure the left backing plate to its mounting bracket and to the plastic air-crossover duct. Tip it out a bit and pull the rubber vent hose out of the rubber elbow on the back of the plate.
Remove two phillips head screws securing the plastic intake snorkel to the back of the backing plate.
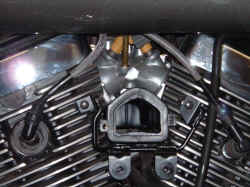 ENGINE WITH LEFT BACKING PLATE REMOVED
The picture above shows the end of the tiny duct through which all the air must flow to run that monster engine. It's gonna get a lot more when we're done here, as this duct will only have to supply perhaps one fourth of the intake air. The rest will come directly from the new right filter.
Trace the flanged end of the snorkel onto the piece of tin or aluminum to make the new block-off plate, marking the two screw holes as well.
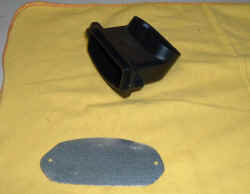 STOCK INTAKE SNORKEL AND NEW BLOCK-OFF PLATE
This will close the hole where the intake snorkel was. Drill the holes in the tin 9/64" and then cut it out with the snips and deburr. You could paint the tin flat black, but mine was galvanized so I didn't. I used silver colored silicone to seal it to the back of the backing plate, applying a bit to the cut edges so it won't rust. It's pretty invisible once installed.
A NOTE ABOUT SILICONE SEALANT: Surfaces sealed with silicone must be very clean and dry. Most silicone cures instantly upon contact with moisture. Silicone sealant does not like gasoline. Therefore, use the minimum amount of sealant possible, and do not allow any sealant around the intake/butterflies of the throttle body where it could be subject to raw gas or heavy vapors. Silicone sealant can plug the fine passages and jets in a fuel system, so allow it to dry thoroughly before starting the engine. In this modification, the sealant is well away from the injectors and throttles, and not subject to high vacuum, so I had no concerns whatsoever about this application; but I thought a warning of some type was in order here. Other types of sealant can certainly be used: I used what I had available.
Attach the tin block-off plate with the original screws from the plastic snorkel. A dab of sealant on the screw threads will keep them from ever vibrating loose. (Yes, even a Nomad vibrates a little bit... )
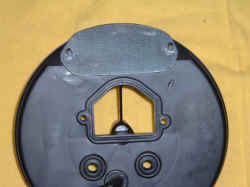 BACK VIEW OF BACKING PLATE WITH BLOCK-OFF ATTACHED
Plug the drip hole in the bottom of the left backing plate with the small sheet metal screw. (You could also use sealant.) Re-install the left backing plate, remembering to re-attach the breather hose on the back.
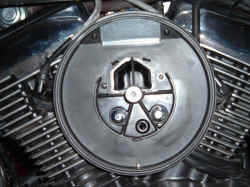 BACKING PLATE RE-ASSEMBLED TO BIKE
I couldn't find metric studs to hold the covers on, so I bought some 75 mm long bolts and cut them off. I used a pneumatic cut-off wheel, but a hacksaw will do fine. My studs ended up about 1 5/8" (40 mm) long, but an exact length isn't important as long as they don't bottom out on assembly. You want the covers to tighten down nicely. If you want to use the thicker (and more expensive!) K&N filter elements, increase stud length accordingly.
You could buy chrome acorn nuts, but metrics weren't readily available here, so I used the nice chrome tri-lobular "El Toro" style wingnuts that came with the new filters. Unfortunately, they are tapped 1/4-20, so drill them out to 17/64" & tap them to 8 mm x 1.25 pitch. By the way, those wingnuts are cast alloy, and not perfectly straight (nor was my tapping job) so I used a 5/16" i.d. stainless flat washer behind each one to seal out the dirt.
Thread in the studs, pop on the filters & chrome covers, screw on the wingnuts, allow the sealant to dry, and it's time to ride! Man that was easy.
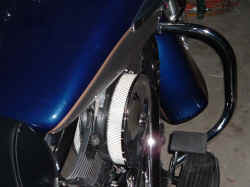
 LEFT VIEW OF ENGINE WITH FILTER INSTALLED
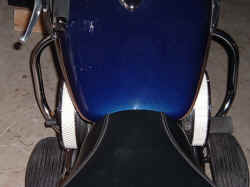
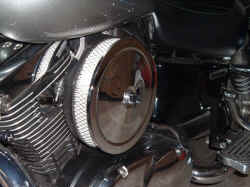
 RIGHT VIEW OF ENGINE WITH FILTER INSTALLED
Other notes and observations:
I could have bought one of the complete aftermarket performance filter kits, but I had four objections to doing so:
- I would either be required to remove the fuel tank and injection system to take out the stock main air duct, or cut out the duct. I wanted to avoid this, as I wanted all modifications affecting the emissions control system to be easily & completely reversible.
- All the attractive ones stick out into your knee.
- All expose the filter element to rain.
- All leave the bike unsymetrical, having lost the left side filter in the modification process.
My mod does not fix item 3, as the paper filters are just as exposed; but the rest of the objections, I have clearly met. As for the elements, I have ridden in the rain without problems, so the filter paper is evidently somewhat waterproof.
The Spectre pleated paper elements do not have a really soft rubber edge, and may not seal as well to the backing plates as Fram or K&N filters. I may add some custom-made o-rings, into the grooves in the stock plastic backing plates to improve the seal. After 3000 miles, though, I don't see any evidence of dirt leakage.
I have the V&H Baggers (dual exhaust) with the stock baffles, and a Techlusion "TFI" accessory fuel injection module. My bike is otherwise stone stock. Compared to stock it has more power, and more sound. It was immediately evident that roll-on tests at different speeds were punchier in every gear. Also, the sound was not too much louder than with the Baggers alone, but much improved in quality. Instead of the dull thump-thump with the stock filter, the sound is now rip-snortin' serious motorcycle noise.
If it sounds like your cam chains are going to jump right off at idle, you forgot to unplug the solenoid wires. Those things click like mad at near-idle speeds. You can really hear them through the new filters. Unplug them for 5 minutes and (unless you have to have a smog emission test) you'll never plug them in again.
Keep all your stock parts, though. I designed this mod to be easy to reverse, since you'll probably have to pass that smog or noise-abatement test some day soon.
Addendum:
After approx. 5000 miles since installing the dual air filter mod on my Nomad 1500 Fi, two issues have cropped up. One of them is annoying at best, and destroying at worse. the other might actually be dangerous, so I'll address that issue first.

I was careful that, although they are semi-insulated, the wires did not contact each other when I tied them up, but I re-loomed them after removing the solenoids, and taped up the terminals securely. If these should contact each other, you will blow the ECM fuse.
Your engine will stop if this happens, which could be a disaster while riding. Remember that gasoline fumes will, in time, loosen electrical tape, so I sleeved mine in plastic loom and secured them in such a way that the tape cannot fall off and expose the terminals. There are surely other good methods to protect the wires, just make sure you use one should you choose to disconnect them. The loom is the black corrugated sleeving at the right side of the backing plate in the first photo.

At the same time I put some thin rubber washers 1/16" x 1/4" I.D. x 5/8" O.D. (19 cents each at the local hardware store) behind the stainless washers that secure the covers. This should provide some more positive dirt protection there. Kawasaki does not provide this on the stock filters, but I think it's a good idea.
Best,
CaddmannQ
Gadget Add:
I've done a modified version of Caddmann's kit. The left side of the bike is completely stock, even the (K&N) air filter is still in the air box. I simply added the Spectro air cleaner to the right side of the Nomad.
|
|
|
|


Note I made my own center knob from a 1.25x8x40 mm bolt and a bathroom faucet knob gluing an Indian head nickel in the the spot where the hot or cold button would normally be. (instructions are here) I have also replaced the Spectro paper air filter with a K&N #E-3527 oiled filter for a little better protection from fine dirt particles and, well, just because the K&N looks pretty cool.
I removed the cold idle solenoids entirely putting shrink tubing over the electrical connections. If you do this, don't forget to cap the two metal tubes the idle solenoids are connected to that run through the backing plate. Failure to do this will create one gigantic vacuum leak and the bike will not run.
Result of all this, substantially increased power especially when rolling on the throttle at highway speeds. The difference is remarkable.
Additional Options (thanks to Raybro57 for this research)
You don't have to use the Spectre air cleaner cover. You can use a higher quality piece supplied by K&N, you can swap out filters or mix and match bits and pieces.
There is a K&N Kit P/N 60-1070 which is a 9" dia. chrome top plate/cover w/K&N embossed on it and the E-3527 air filter element and a bottom plate for approx. $109.00.
The K&N 9" dia. chrome top plate/cover has a separate part number of 06883 but it is not listed on the K&N website. You can find it on Amazon..
The K&N 9" air filter element P/N E-3527 runs approx. $50.00 each. You can order the element and chrome top plate separately to save money but the parts retailer may not be able to do so through their distributor. That's why the 60-1070 kit was mentioned previously.
And there are wraps to cover the air filter element for really dusty usages but it could be used as a rain cover instead like when your bike is sitting out in the rain, etc. The P/N's are E-3527PK (BLACK); E-3527PL (BLUE); E-3527PR (RED); E-3527PY (YELLOW). They run $25-30 each..
The Spectre P/N 4770 9"x2" white paper filter with chrome top plate and bottom plate are approx. $20.00 with a replacement filter P/N 4805 running approx. $10.00.
The higher quality 9"x2" cotton filters are approx. $16.00 each and they come in three colors...P/N 48056 BlUE; 48052 RED; and P/N 48059 White
Quieting The Cold Idle Solenoid Chatter
Thanks to Bruce Anderson for this quiet but huge tip:

To get rid of most of the noise all you have to do is grab two 19 inch pieces of 5/16th inch fuel line. On each relay there is an unconnected tubing port. See picture, red circles. Just plug one piece of fuel line onto each of the air relays and feed the fuel lines into the air tube (blue circle). 19” seems to allow it to get all the way to the other side. If you don’t go all the way, it actually seems to get a little worse because it echo’s down the air tube.
This causes the noise to move over to the other side, which makes it almost silent if you still have the stock air cleaner. If you have done Caddmann on both sides, this will probably not have much of an effect, it will just move the sound to the other side.
Tag: intake


Sundance
"K&N Kit P/N 60-1070 which is a 9" dia. chrome top plate/cover w/K&N embossed on it and the E-3527 air filter element and a bottom plate for approx. $65.00." Just thought you might want to update the page. I'd go 65.00 but 108.00 a piece is a little pricey to me.
Thanks for a great tip and a great site! Let me know if you ever have web development questions.
Bill Holman (aka "Sundance"), Software Developer