Clutch Spring Replacement the Easy Way
When It Starts Slip, Slip, Slippin' Away...
The history of the Vulcan 1500/1600 clutch spring is a mixed one. Some will swear the spring is a design flaw destined to wear out and need replacement every six thousand miles. Some of us just don't know how that could be with clutch springs that last 50,000 miles (mine) and more.
Whatever camp you find yourself in, the spring will, eventually, need replacement so whaddya do, haul the bike off to the dealer and get dinged for three hours of labor? No way! This is really a simple project requiring only basic hand tools (though, as you'll see a compressor and air wrench can be pretty handy).
Just a bit of history before we get rolling. This is my '01 FI Nomad clutch spring at 50,000 miles.

You should also know I varied a 'bunch' from the way the 'book' would have you do this.

Standard spring (left)
MS Spring (right)
I'm going to save you a lot of time and angst, trust me. You will also see I used a Mean Streak spring (slightly thicker than the stock Nomad spring) and a set of Judge's washers (explanation later) which should not only keep this spring going strong for a long long time but also gives a more positive clutch action.
Another option is to replace your diaphragm spring with a Barnett spring (especially if you already have a Mean Streak). This gives you more "grab" without losing the slipper clutch.
So, is your clutch slipping a little in top gear? Is fuel mileage dropping during highway rides and you aren't quite sure why? Do you have a ton of miles on your Vulcan and the clutch is grabbing way out at the far end of the lever travel? Well then, it may be time for a new spring so lets get started. This is easy...really!
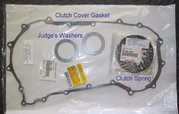
What You'll Need
- Clutch cover gasket (Kawasaki part number 11061-1081 for 2001 and later, check Kawasaki's parts diagrams to be sure this is the proper part for your bike.)
- Clutch Spring for MeanStreak
- Kawasaki part number 92145-1449 or stock part number for your bike--your choice. Or...
- Barnett clutch diaphragm spring. See Barnett's site. You may be able to find them on Amazon, but check pricing.
- Exhaust header gasket (stock Kawasaki or Harley Davidson part # 17048-98
(about six bucks for 2 gaskets)
- Optional 1- set Judges Washers (see explanation here) available from Robert (Judge) Oglesby. Judge is on the road quite a bit so be patient waiting for return e-mail.

Tools
- 8 mm socket or wrench
- 10 mm socket or wrench
- 12 mm socket or wrench
- 14 mm socket or wrench
- 27 mm socket
- 8 mm Allen Head Wrench
- hand cleaner
- towels/rags for after project cleanup. If you're doing this on the sidestand you won't lose any oil
- An impact wrench is strongly recommended to remove the 27 mm clutch spring nut. If you don't have one maybe a neighbor will let you borrow their compressor and gun. You'll only need it a minute or two. If there's no way to borrow or rent an impact wrench then you'll want to check Ol' Sarge's Web page for his technique for muscling the clutch spring nut off.
The Project
If you do this 'by the book' you'll be removing the speedometer assembly, the gas tank and a whole bunch of unnecessary stuff. Toss the book and follow along. This procedure (I just finished my Nomad so it's all fresh in the noggin) will get you through the task in two to three hours.
You have a choice, putting your bike on a lift will give you slightly easier access to some of the nuts/bolts and other parts and possibly save your back a bit of bending. Doing the project with the bike on the sidestand means you don't have to drain the oil. You won't lose a drop, trust me. Lets do this.
- Cut zip ties holding brake switch cable (and any other wiring you might have added) to the right side downtube.
- Remove 8 mm bolts holding rear brake fluid reservoir and reservoir cover to bike.
- Remove (2) 14 mm bolts holding floorboard and brake pedal assembly in place. Be careful not to stretch brake line or brake switch wire. Remove small spring connected to brake switch assembly. Unscrew brake switch holder from brake switch being careful to turn the holder, not the switch (you could break the wire off). Put floorboard/brake master cylinder assembly out of the way but not with strain on the brake hose. It will help if you reach down inside the lower frame tube and unclip the brake hose.
- Remove 10 mm bolt holding right side of rectifier bracket to frame rail.
- If you're doing this with bike on the ground put something (a floor jack would be good) under the engine to provide a bit of support (it isn't going anyplace, this is just overkill). Remove (2) 13mm engine mount bracket bolts from right side downtube.
- Remove front exhaust pipe. If you have stock exhaust, note the pipe heat shield is held in place by three hose clamps with 10 mm bolts. Just loosen those bolts and slide the clamps 'up' toward the front of the bike. The heat shield assembly should come free fairly easily. Don't force anything or you could bend the lower portion where it slides into the lower heat shield.
- Remove rear lower frame rail bolts using 8 mm Allen wrench (these are bolts that screw into the frame). Remove front 8 mm Allen head bolts from downtube (these are held in place by nuts. Put one hand on those nuts or they'll fall to invisible places once the bolt comes loose).
- Now you have a clear playing field and should be able to see all of the 8 mm bolts holding the side cover in place. Before you start removing these make a template (using your replacement gasket) so you can keep track of where each bolt goes. There are many sizes and you don't want to get them mixed up.

- Remove the 8 mm bolts and wiggle the side cover off. You may have to tap it a little with a soft mallet. There are two alignment pins still holding it in place so don't get it cocked as you pull it away from the bike.
If you're lucky the cover will separate with absolutely no damage to the original gasket and you can re-use it. If there are any cuts or tears you'll have the option of using gasket sealer or simply replacing the gasket. - As the side cover comes off keep careful watch for a thrust washer that will probably fall from the forward area. That washer fits over the starter end. Put it back on the starter so you don't forget it.

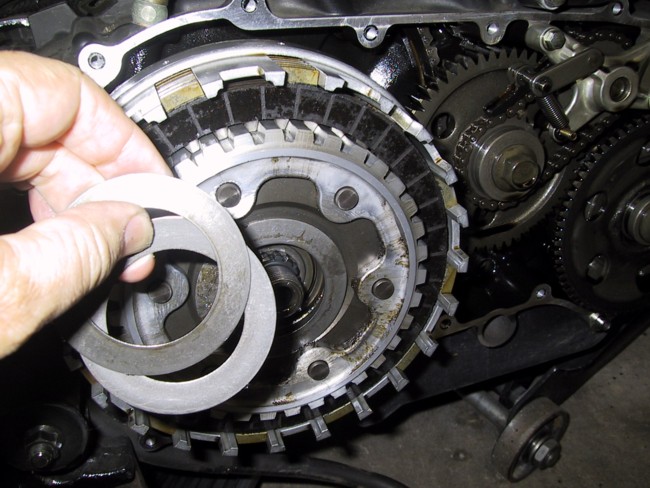
- With the cover off this is what you'll see. Pretty tidy eh? Look closely below the clutch basket and you'll see a large dark hole. This is the 'hell hole' for those who drop nuts/bolts/pennies and other items into the sump. Save yourself a lot of possible trouble and cover the hole with something. A paper towel will do.


- Using a small screwdriver, carefully pry the snap ring out of the clutch cover. Set the ring aside where it won't get kicked across the garage. Now you can remove the cover and set aside.
 Remove the clutch push rod and set aside (preferably showing the order you've taken everything apart) and now you're looking at.....THE NUT.
Technically 108 foot pounds of pain in the butt unless you have an impact wrench. If you have a compressor you're home free. A couple of hits with the impact wrench and a 27 mm socket and the nut zips right off. If you only have a breaker bar...go get a long extension to slide over the end and prepare to work a little.
- The nut is off?Way to go! Have a beer.

- Now you can remove the clutch spring, carrier and three washers being careful not to pull a bunch of clutch friction plates away with the assembly. Note the orientation of the washers: They are in this order:
engine )() then the clutch spring ). - If you're only replacing the clutch spring just remove the original, put the new one in (make sure it's bowed 'outward' at the center), put grease on the washers to hold them in place (otherwise they can slip and you can't get the assembly back together properly) and put the 27 mm nut back in place.
- Clean everything up making sure (unless you're re-using the original gasket) there is absolutely no trace of the original gasket either on the engine or the cover.
- Re-assemble in reverse order of disassembly making sure your torque everything properly. Don't forget to remove the towel or whatever you used to plug the oil return hole!


Torque Values:
- Clutch cover bolts 87 inch pounds
- Floorboard bracket 25 foot pounds
- Downtube/frame tube bolts 32 foot pounds.
Additional Instructions For Heavy Duty Clutch

A caution: Kawasaki builds in clutch slip which is probably a good thing for new riders and those who don't/can't/won't downshift properly. The slip prevents the rear tire from locking up on a downshift possibly causing a mishap. Judges washers do away with this slip. Users get very positive clutch action but you have to use the clutch properly.
If that sounds like you take a look at this.
Those are Judges washers. One is just very slightly larger than the other so it can slide over the 'step' on the clutch spring carrier. The washers are available for $25 (at this writing) from Judge or Tim Acree at the e-mail addresses shown above.
The following is a step by step instruction showing how Judge's parts enter into the mix of washers, springs and other parts. In the instructions Judge notes some possible increase in clutch lever resistance. I haven't noticed this with my Nomad. One thing I have noticed is a much earlier engagement of my clutch (it'll take a little practice). I haven't tested the possibility that my rear tire could break loose on a badly done downshift.
Judges 1500 & 1600 “Clutch-spring-washers” instructions............
The washers in this kit are to be used with ALL other O.E. clutch parts.
When installed properly, the clutch-spring-life will be (at LEAST), doubled!! You will also notice a more positive clutch “feel”, quicker “roll-on” acceleration and in many cases, a smoother shifting transmission!!
This assembly will increase rear wheel traction! Make sure to match engine speed (RPMs) to ground speed as you down-shift. If not, the rear wheel can lock and skid, causing loss of control!! This kit will make the clutch work similar to the “old-style” pre-slipper clutches that are on most bikes, including the VN800 and VN2000. USE CAUTION IF YOU ARE A NEW Rider!!
The larger I.D. (inside diameter) washer is installed on the “holder” BEFORE the spring is installed.
NOW install the spring against the washer. The washer will carry the load and the wear. The smaller I.D. washer is installed on the lower half of the “holder” BEFORE the 3 limiter springs are installed. Now install the 3 limiter springs.
Use a “sticky” grease to “glue” ALL parts together during the install, or they WILL fall off of the “holder” and be damaged while tightening the 27mm nut!! Do not use “magic” or “special” grease. It must be able to melt away as the oil heats up!
The assembly MUST LOOK LIKE THIS when installed on the holder ( from engine side out):
| Engine] | ><> | I | * | I |
| 3 limiter springs | small ID washer | Clutch spring | Lrg. ID washer |
* (LATE 1500’s and 1600’s). If you have the factory installed “indexing-washer” install it as it was, between the spring and the large ID washer. It may be eliminated ONLY if the Mean Streak spring is used WITH the washers. I do NOT have data on the life expectancy of the spring, when eliminating the indexing washer. (The Late models have had the “holder” back-cut the thickness of the indexing washer.)
1600 riders….I NEED DATA! I’m having more and more calls for the 1600 (& late 1500 kits).
For 2-up riding, performance or towing, I highly recommend using the Mean Streak spring, (Kawasaki part # 92145-1449). A slight increase in clutch-lever-pull may be noticed!
If you have removed the clutch plates to check them, Make SURE that the last plate installed is in a “short-slot” of the clutch-basket, NOT the same “slots” as all other plates, or your clutch will begin to slip after just a few miles! Make sure that you align the oil-pump-gear WITH the clutch-basket-gear or damage to the gear may occur when the 27mm nut is torqued or on start up!
Judge
Rev. 8 / 26 / 08
Tag: clutch


CaddmannQ
I stuck a plastic pipe through the rear spokes, and let it hit the top of the swingarm on both sides. AVOID the brake hose! Put a 1" steel roundbar in the plastic pipe. Put the trans in low. Crank the nut off with a breaker bar. The bike will creep across the floor so don't let it fall off the kickstand.
The engine hangs fine on just 3 mounts. Nothing really needs to be jacked. I did it all right on the kickstand.