More Power For Your Carbed Vulcan With a Coyote Kit
Coyote Kit Instructions
August 12, 1999
[Gadget Sez Thanks Coyote! This info also posted at VROC.org]
The Coyote kit was developed by several VROC members in the USA who worked to adapt automotive air filters to their Vulcan 1500 Classics as low cost alternatives to commercial kits. The kit was named the Coyote Kit by several friends of John (Coyote) Shreve who heckled him as he was installing it. Somehow, the name had a ring to it and stuck, but, credit goes to the many members who worked to find the right parts and get the carburator settings correct. This is a very simple and cheap alternative to aftermarket carb air kits such as the Thunder kit and Hypercharger. Basically the mod involves fitting a either a 9 inch K&N filter from a small block Chevy or an 8 1/2 inch K&N filter directly to the right hand side air box. Cost is about $50 to $70 American or $140 Aus.
Please note, this modification is for 1500 Classics and Nomads only. It does not apply to any other Vulcan models.
Parts List
- For the filter and chrome cover, there are two alternatives (and probably more we haven't discovered yet)
- Option 1 is a 9 inch filter for a small block V8 Chevrolet. The K&N kit consists of a 9 inch round K&N filter with a chrome cover. The K&N part number is 60-1110 (my local auto store ordered it through a Sydney supplier called 'Rocket'. This kit works well, but, it is slightly larger than the carb backplate and needs some weatherstripping to make a good seal.
- Option 2 is the Morosso 8-inch kit (p/n 66310) with an optional K&N filter (p/n E3492). The advantage of the 8 inch filter is that it fits perfectly inside the stock carburetor backplate, causing less problems with the sealing and the smaller size looks better.
- Jason Brandt has let us know that the 8-1/2" Moroso filter fits well in the stock backplate, and fits nicely under the stock "dog bowl" cover.
- Comment by Coyote: I personally prefer the 8-1/2 inch filter, but, either will work fine.
Note: The 8 1/2 inch filter was an idea contributed by another VROC member, Steve Donat, who actually went to a racing supply store and looked at filters until he found a combination that worked better than the 9 inch filter.
- 1 K&N recharge kit for cleaning and recharging the filter part number 99-5000 (just the oil will do at first as it should not require cleaning for a long time but will need oiling every few thousand kilometers or more as the filter is exposed).
- 1 Bolt 6mm x 25 to hold on filter kit (chrome or stainless socket cap looks good)
(Note: The Morosso cover will require a 6mm x 20) - A flat piece of about 2 mm aluminum or stainless to cut out a plate to block the hole in the stock backplate where the crossover tube is gonna be removed.
- Some silicon to seal the plate. I recommend automotive RTV for this purpose.
- If you don't have reed valve covers, then we need a large vacuum cap to block the air intake on the vacuum switch that feeds air to the reed valves. Also a couple of smaller vacuum caps to plug some other holes that are gonna be left in the stock backplate. Reed valve covers are easy to make from 6 mm aluminium plate. Just trace around one of the existing covers - cut, file and drill the mounting holes. The covers are identical. You will require four 6mm x 20 mm socket cap screws to fit the covers. By fitting these and removing all of the air injection system tidies up the engine and gets more crap out of the way. Spray the covers with a bit of hi temp flat black paint before fitting and no-one will know that they are not standard.
 Here is a picture of the reed valve housings that get removed if you install reed valve covers (coasters).
You can get Reed Valve Covers for the 1500 Classic from Chuckster's Customs
- Adhesive backed foam weather stripping from the hardware store
Note: Weatherstripping required for the 9 inch K&N Kit, but, not for the 8 1/2 inch kit.
For carb setup after the kit is installed, the following settings work well: 170 main jet (they are hard to get in Australia - forget Kawasaki as they only stock standard parts. My local motorcycle mechanic drilled out a jet to suit. 45 pilot jet (standard) 2 x 0.62 mm shims under the stock needle. These are small 1/16" brass washers available at your hardware store. Pilot jet screwed out 3 - 3 1/2 turns. If you want to really get the system working, drill the pilot air hole (aka vacuum port) out to 1/8". It is not required but makes the carb more responsive. Keep in mind, each bike is different and to get the right setup may require tweaking on your part.
Notes by Coyote:
- If your carb has never been rejetted, I would recommend starting by just installing the 170 main jet and don't install the shims under the needle until you see how it runs. Many bikes will run good without the shims and it saves you the problems of opening the top of the carb and having to reseat the diaphram. If you are running a little lean, then install the shims to raise the needle. The purpose of raising the needle is to richen the mixture a little. You also need to set the Pilot screw somewhere between 3 and 3 1/2 turns out, depending on the individual bike.
 Also, the 170 jet is in combination with the stock needle. If you are running an aftermarket needle, you will have to change settings accordingly. For instance the Dynajet needle would require a 170 main jet and the needle would need to be set on the 4th notch from the top with no shims under the clip and 2 shims on top of the clip.
- My personal preference is to use the stock needle and the 170 jet because it gives a good combination of power and economy. The Dynajet needle setup gives good power, but, the fuel economy is typically not as good.
Instructions
- Remove seat and tank.
- Remove 1 screw holding plastic airbox on inside of the frame on the left side on top of engine.
 Remove airbox/throw away. Here is a picture of the airbox that you remove from under the tank.
- Remove left side chrome cover and air filter and bracket and filter backplate/ Throw away.
Here is a picture of the dissassembled left side filter assembly
- Remove chrome cover, carb backplate, and bracket from right side/ Save backplate and bracket for later. Throw away chrome cover.
- Remove big intake air supply hose from the crossover tube connected to vacuum switch on top of engine. At this point, you need to disable the reed valves by one of two methods:
- Option 1: Install BIG vacuum cap in place of Intake hose. Your reed valves are now disabled. (This is a good thing and may stop backfiring Your engine will also run much cooler)
-
Option 2: You can totally remove the vacuum switch and all associated plumbing by installing Reed Valve Covers (Sometimes called Coasters) If you have reed valve cover plates, you can remove the vacuum switch and all associated plumbing and throw it all away. Plug the small vacuum hose that comes off the top back of the carb body (near where the throttle cables connect). A plastic golf tee or a sheet metal screw in the hose is a good fit if you don't have a vacuum cap.
 Here is a picture of the vacuum switch and the hoses that can be removed if you install reed valve covers.
- At this point, you have to remove the crossover tube. You have your choice of two methods.
-
-
The recommended method is to cut the crossover in two and pull the remnants out without disturbing the intake. You can use a saw or tin snips or several other tools to cut off enough of the tube so you can remove it.
- The other method is to unbolt the intake (4 allen bolts) This is a *censored*. Make sure the carb clamp is loose and carb is removed from the intake. It is not necessary to remove cables from carb.
DO NOT DROP ANYTHING INTO CYLINDER HEAD INTAKE HOLES
Carefully remove the crossover tube by pulling it out from the right side. Throw away crossover tube. After the crossover is removed, reinstall the intake by bolting it back to the cylinder heads with the 4 allen bolts. - Picture of crossover tube from 98 Classic

- Picture of intake taken from the left side of the bike
 Note: 2 of the 4 allen head bolts are visible.
 - Coyote Notes: I highly recommend cutting the crossover tube out. I have seen the aftermath of 2 people who dropped small nuts into the intake without realizing it (It's not pretty). The nuts that end up in the intake are the small nuts recessed in to the ends of the crossover tubes. Many don't notice them or the fact that they can fall out until it is too late and they are sucked into the cylinder. I have also seen many who have had problems getting a good seal on the intake when they reinstalled it. All in all, the possibilities of problems are much smaller if you do not remove the intake.
-
-
- Twist the carb around until you can get to the bottom. Remove the screw holding the carb warmer tube in. Pull firmly until the carb warmer tube comes out of the carb (It maybe tight) **or you can remove the screw and swivel it out of the way
- **NOTE: Most Australian Models will NOT have a Carb Warmer. You can now get to the pilot adjustment screw. Screw it all the way in and then back it out 3 to 3 1/2 turns.
- Note: on American models, if your pilot screw has never been adjusted, there will be a little silver colored cap covering the pilot screw (Thank you U.S. government). To get to the screw, carefully drill a small hole in the middle of the cap, not going deep enough to hit the screw. Then screw a small sheet metal screw in the hole and use this to pull the cap out. You can now adjust the screw.
-
There is a small nipple on the bottom of the float bowl to drain the gas from the float bowl. After draining the gas, loosen the 4 screws holding the bottom of the carb and carefully remove the float bowl.
-
Remove the old main jet and install new main jet. Reattach float bowl to carb. Reinstall carb warmer tube and small bracket and screw that hold them in.
-
At this point, if you intend to adjust the needle or shim the needle, you must open the top of the carb. This is a tricky process and there are other sources on how to do it, so, I won't document it here. Basically, if you choose to so this, be careful and do not tear the diaphram and the diaphram MUST be seated properly around the top of the carb. If it is not seated correctly, the symptom will be low power and poor throttle response. One handy way to seat the gasket is to freeze it first. No kidding. Just put the diaphram in the freezer for a little while and let it get good and stiff. It'll stay right where you put it long enough to get the top of the carb back on with no slippage.
-
Reattach the carb to the Intake and tighten clamp.
- Now, look at hole in the stock carb backplate that is left by the crossover tube that should now be on your garage floor. Cut a plate of aluminum or any other relatively stiff piece of metal big enough to cover the hole. Drill a couple of holes in the plate to attach it to the backplate using the screws in the screw holes left from the crossover tube removal. Put some RTV (Automotive silicon sealer) around the back of the hole, attach the plate you just made and screw it on. Make sure the silicon makes a good airtight seal.
- Picture of an unmodified carburator backplate
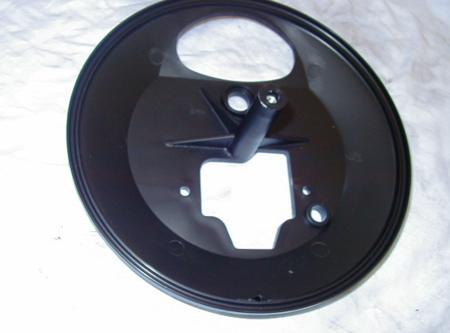
- Picture of a modified carburator backplate
 mounted on the bike. Note the metal plate installed and sealed with RTV and the weatherstripping around the outside of the backplate to make a good seal with the K&N filter. The weatherstripping is not required if you use the 8 1/2 inch filter.
- Picture of an unmodified carburator backplate
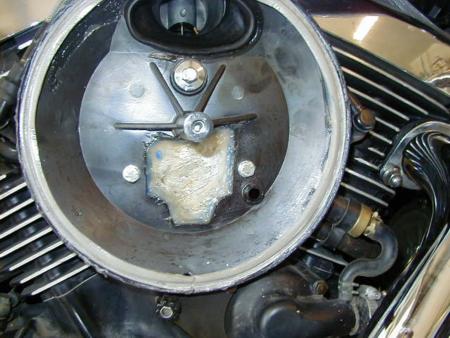
- Reinstall the bracket to hold on carb backplate. Make sure your crankcase vent tube is attached to the backplate (You need that one), and carefully check that all holes in the backplate have been plugged or have something attached. We don't want any unfiltered air getting in.
-
Attach your now modified backplate to carb and bracket. See picture of mounted and modified backplate.
-
Clean the inside of the stock backplate. Give final clean with metholated spirits on a cloth. Carefully attach adhesive backed weather sealer around the inside lip of the stock backplate so the K&N filter will get a good seal. The K&N filter kit comes with a stainless cover, the filter, and a baseplate with a hole in it. Throw away the baseplate. Coyote Note: This step is not necessary if using the 8 1/2 inch filter kit.
-
Install K&N Filter on the stock baseplate. It will be just a little larger than the outside diameter of the backplate but the weather-stripping will insure a good seal. There is a groove around that centre of the rubber filter base - it just stretches to fit over the raised ridge on the stock backing plate. After about an hours running, it maintains the shape to fit the ridge perfectly every time. Note: The 8 1/2 inch filter will fit nicely inside the lip of the backplate.
-
Install cover plate and bolt on with chrome bolt. Be careful with the bolt. DO NOT OVER-TIGHTEN. It just needs to be snug. Screw it in until it feels as though it is seating, then back out about an 1/8 - 1/4 of a turn. Don't be ham fisted or you will break the plastic mounting that the bolt screws into. Coyote Note: This step was added by Bruiser and is serious. Mine broke after about a year of use due to me over tightening slightly every time I put the cover on. You can use a fiberglass repair kit with fiberglass cloth and resin to temporarily reattach the center post until Kawasaki can get you a new one. I learned this the hard way.
-
Reinstall tank and seat
-
Turn key on Start bike Ride Smile at new found power and response
Here is a picture of the Coyote Kit  using the 9 inch K&N filter.
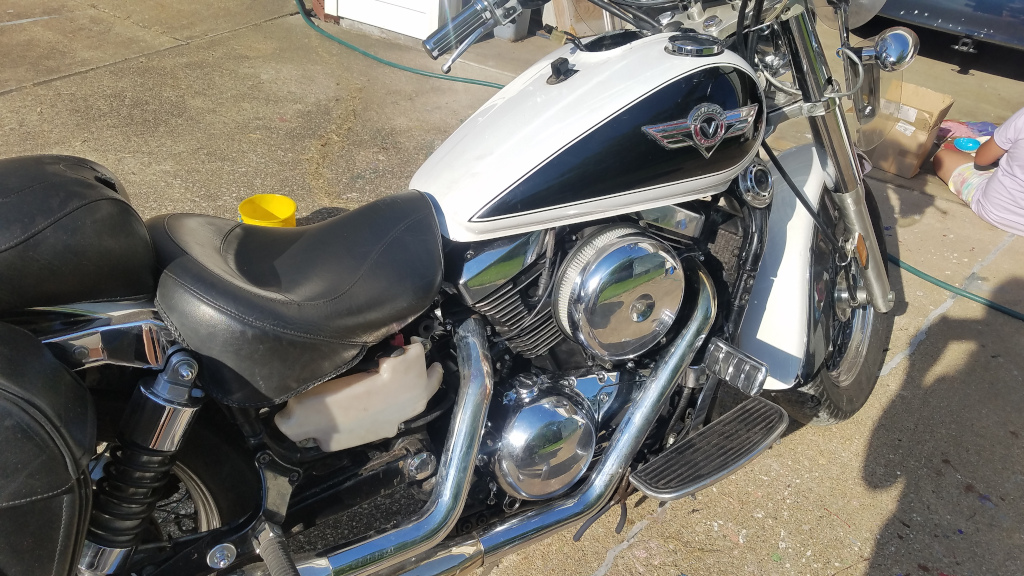
Here are a couple of pictures from Jason showing the 8-1/2" filter under the stock chrome covers:

Tag: intake