Dress Up Your Nomad's Front Wheel
...even though Kawasaki says you can't

Like The Look?

Being unable to pass up the sale price of Kawasaki's chrome front brake covers ($50 compared to normal $260), I ordered a set figuring I could make them work on my 2004 Nomad: even though according to Kawasaki they would not fit. Kawasaki's part number for these covers is K53020-200M and they are listed on their website as fitting the following models:
- 2001 Vulcan 1500 Nomad
- 2000 Vulcan 1500 Nomad
- 2000 Vulcan 1500 Nomad Fi
- 1999 Vulcan 1500 Nomad
All of the above use an analog (cable driven) speedometer. The enclosed instructions, however, only state that they fit the "VN1500G". I can't vouch for any of that, I only know for certain that they were not designed to fit my bike (VN1500L5L: the California model 2004 Vulcan 1500 Nomad Fi). I had to make them fit, and part of the job was rather involved. In fact, I'd advise against doing it unless you are daring, have some machine tools handy, and are willing to risk grinding on your forks, Use your own judgement, or better yet, consult someone with really good judgement! If your fork leg cracks it's not my fault: remember that I warned you! In fact, I absolutely advise that you do not grind on your bike at all, ever, for any purpose.
There are some subtle differences between the Nomad with the mechanical speedometer (which these covers are designed to fit), and mine which is electronic. The primary difficulty is that the right disc cover is designed to slip over the mechanical speedometer gearbox on the front axle. The L5L model just has an ordinary spacer there.
I had to make the adapter sleeve to make up the difference in diameter between the stock axle spacer and that disc cover. I didn't have a lathe handy, but I made a spacer from an ordinary 1 1/4" I.D. aluminum shaft collar, turned the O.D. down just a smidgen using my little drill press as an Okie lathe, and I buffed it out to a nice shine. The I.D. was .080" bigger than my axle spacer, so I made a thin shim to take up the difference. I pressed the whole thing together with a 2x4, a plastic pipe fitting, and a 2 lb. hammer. and everything fit up nice and tight. Too tight in fact. When I tightened the set screws on the collar to the spacer it distorted the OD a bit, and woundn't fit in the chrome cover. I had to dress it off round again, and buff it a little more. I set the collar, shim, and all the set screws in blue Loc-tite.

This was a medium tight press fit, based on the dimensions of the parts I had. The three stock axle spacers I measured varied a little in their outside diameters and the right disc cover inside diameter may vary also, so you should mike your own parts before machining the spacer if you want to get a good press fit. Also, only one face will show, which is the one marked "polish". Make sure this face is the one that shows when you assemble.
 |
When I test fit the right cover assembly to the forks, the chrome plated boss welded to the right disc cover hit the inside of the aluminum fork leg. I could have ground off the chrome boss a bit (ugh!) but figured there was enough meat in the fork leg to grind a small relief, and I did so.
A funny thing I noticed was that the anchor tabs for the mechanical speedo box are still cast into my right fork leg. Evidently this works as a replacement leg for mechanical speedo models, as long as you don't have the chrome brake covers (or don't mind grinding).
There are two ways around this little roadblock.
|
Caddman CAUTIOUSLY ground the relief in the fork with a 1/4" pneumatic die grinder and 1" diameter medium grit stone.  You can't see the grind mark when the bike is assembled unless you look very closely at the front axle, 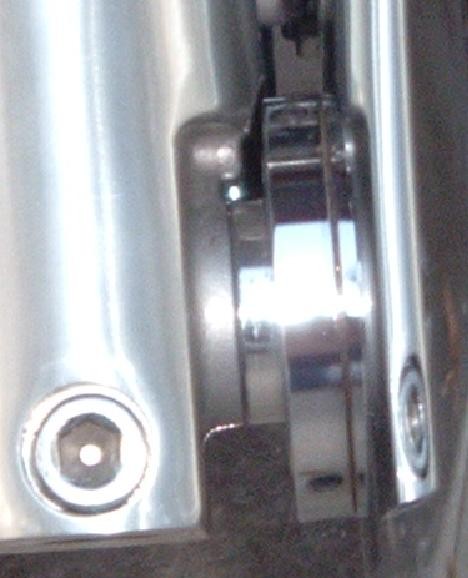 |
|
Gadget's Method: I chose to grind a relief in the disk cover rather than the fork leg  |

The attachment brackets included with the kit are slightly adjustable by virtue of having some slots, as well as the covers having slots. This helped a lot, but I also had to bend both brackets slightly to get the covers all lined up just right. They are easy to bend by hand once bolted to the forks.
Here's some pictures of the finished product, as well of a shot of the stock brake so you can tell what it looked like before. There's a small cutout in the right cover for the speedo cable (which my bike doesn't have), but you don't notice it unless you get down to a close undershot look.
 Before |
 After, Right Side |
 After, Left Side |
Enjoy,
CaddmannQ


