Fuel Filter Replacement for '01-04 Classic/Nomad
You're probably wondering why such a narrow window of years. It's because those are the only years that have a replaceable filter inside the tank. The '00 FI system used for Classics, Nomads, Drifters and Mean Streaks continued to use the same filter setup as the carbed bikes with the filter outside the tank. Vulcan 1600's (5.3 gallon tank) have a screen on the fuel pump but no replaceable filter. So, if you have an '01-04 Nomad or Classic this page is for you
When and why might your filter need replacement? The "when" in many cases is never but if you've pumped suspected dirty fuel into your tank or you're losing performance then it sure can't hurt.
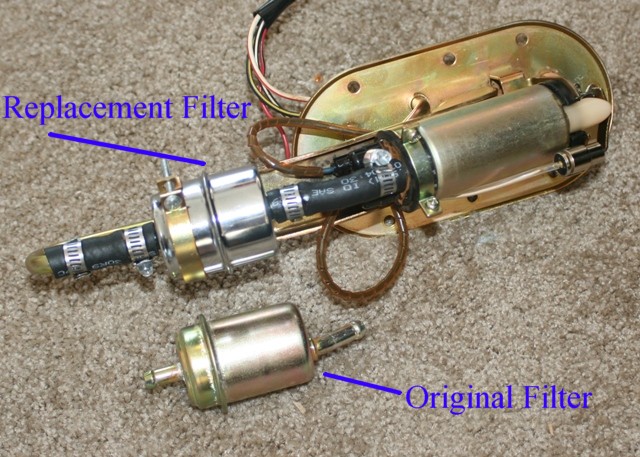
You'll want to take a look at the picture (below) which clearly shows the fuel filter. It's nothing unusual, just the same sort of canister used in many automotive applications. On the Vulcan the filter is mounted using flexible fuel line and standard hose clamps making it easy to remove and replace.
 |
 |
So, you've checked the pictures, you know where the filter is and pretty much what it looks like, lets change it out!
What You'll Need
- 12 mm & 8 mm sockets for removing gas tank and fuel pump assembly
- >Pliers for removing hose clamps
- Phillips Screwdriver
- 1- Purolator Fuel Filter part #F20011 (plastic) or similar. Almost any standard filter will work.
How To Do It
- Remove the fuel tank, (see this page for details)
- Turn the fuel tank upside down (set on a towel or other pad so you don't scratch the paint)
- Remove the 8 fuel pump bolts with an 8mm socket or wrench
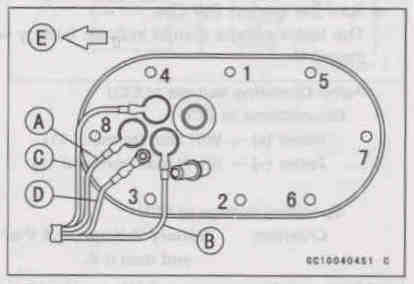
- Carefully remove the fuel pump assembly, wiring and gasket from the fuel tank noting the orientation of tabs. (you might even want to take a digital picture or series of them as you go in case a guide is necessary for reinstallation.
- DO NOT discard the fuel pump gasket (this is different than the Service Manual), as it can be reused.
- Remove the Phillips Head screw on the retaining strap that holds the filter to the pump assembly
- Remove the two gas line clamps & hoses on each end of the fuel filter
- Remove the fuel filter from the assembly
- Replace the fuel filter. Any fuel filter with the same or similar dimensions as the OEM filter should work just fine. Caution: If the new fuel filter is too "fat", it will not fit back into the fuel tank. Also, make sure the new fuel filter is inserted correctly with the "in flow arrow" in the proper direction.
- I used a Purolator F20011 Fuel Filter (plastic, see through filter)
- Reinstall the two gas line clamps & hoses to the new fuel filter, close the retaining strap and reinstall the Phillips Head screw. It doesn't matter if the strap is not around the new filter, in front of it is OK, as long as the filter is held snuggly to the fuel pump assembly.
- Liberally clean the fuel pump & fuel pump screen with a good throttle body spray cleaner.

Reinstall Fuel Pump
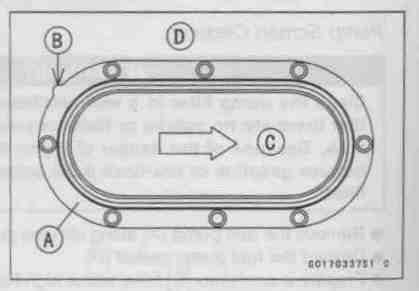
- Reinstall the fuel pump gasket with its tab facing back & left (see "B" in photo at right)
- Carefully reinsert the fuel pump assembly into the tank

- Follow the tightening sequence for the 8 fuel pump bolts as shown in the photo at left
- Tighten the bolts to the specified torque (61 in-lb) using a non-permanent locking agent
- >Reinstall the fuel tank/li>
- Add gas, start bike & check for leaks
- Done! Go for a ride.
The Service Manual says to replace the gasket but that's only necessary if it's damaged in some way. The gasket is thick sturdy rubber with 8 brass grommets to prevent pinching and over torqueing. It should last a long, long time. However, if you want to follow the Service Manual, get a new gasket before you begin this project.
Additional Info From Fire03Meany As Posted On The Delphi Vulcan Forum
Much Thanks to Quinton Grubbs
Additional Info From Fire03Meany


