OEM Air Shock Oil Recharge
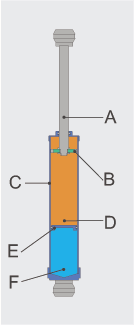
A = Rod
B= Piston
C=Shock Cylinder
D=Oil Reservoir
E=Floating Piston
F=Air Chamber
Thanks To GrayWarrant
(Project based on an original posting by Siderider)
There have been many questions over the years about the type and amount of oil inside the stock Kawasaki air shock used on Nomads and many Classics. Finally, we have some answers and, even better, a way to swap out the old oil for new and make sure both sides are balanced. A caution: If you do this you'll be working against a reasonably strong spring. Be very careful once the spring is compressed and keep the shock pointed away from you and the good china.... just in case. GrayWarrant had 34,000 miles on his Nomad when he got tired of the bike bottoming out when riding two up or loaded. Before spending hundreds of dollars on a set of aftermarket replacements he decided to try his hand at replacing the original shock oil. The difference is well worth the time and effort.
What You'll Need
- (3) Large metal hose clamps or a spring compressor tool available on Amazon or possibly your local auto supply store.
- Container 15W fork oil
- Large syringe
- Tube blue Locktite
Here's How
- Lift scoot, remove saddlebags, take off shocks by removing the four 17mm mounting bolts. Once off, look the shocks over and make sure you have no oil leakage, cracks or dents and if you can squeeze them together (ha!), that they operate smoothly (we'll check this later once the springs are compressed).
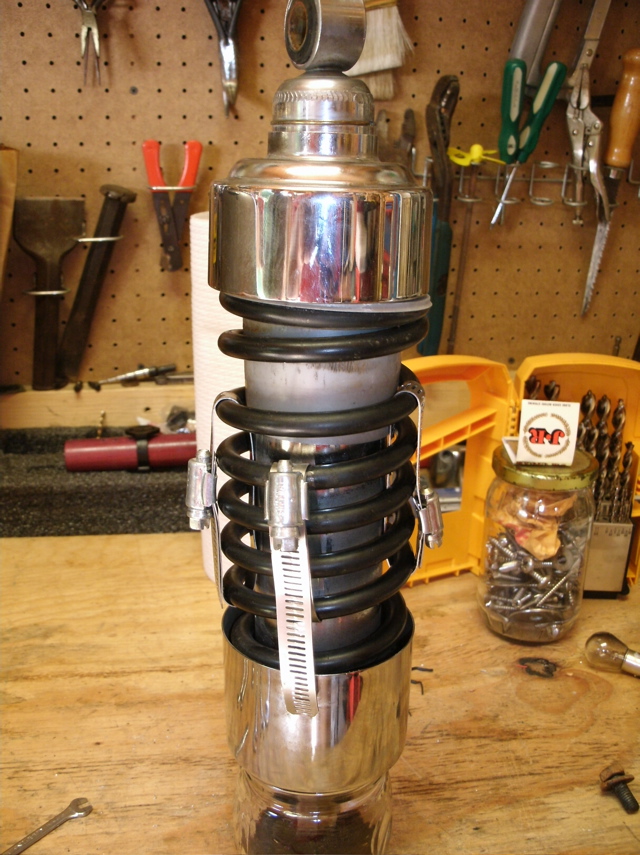
- If you have a spring compressor, skip this step. Using three large hose clamps, compress the springs as shown at right. Compress each clamp a couple of turns then move to the next clamp and do the same. The idea is to keep the pressure on each clamp as even as possible. As noted above, the compressed spring can be dangerous so make sure the shock is pointed away from you at all times.

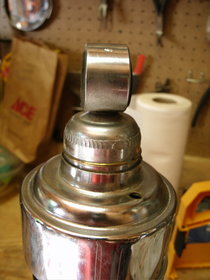
- Once you have your springs compressed, pressing down on the bottom cap (which is now the top cap) will expose a small retaining ring as shown at left. Use your favorite pointy/prying tool and work that retaining clip off, don't tear it up, you'll need it when you reassemble.
- You can now slide the compressed spring up and off the shock assembly, there is a metal washer, plastic collar and plastic sleeve that will likely come off with it. Be careful to note the order of assembly. Set the spring and associated parts asside, you can clean it up with some 0000 steel wool now or later.
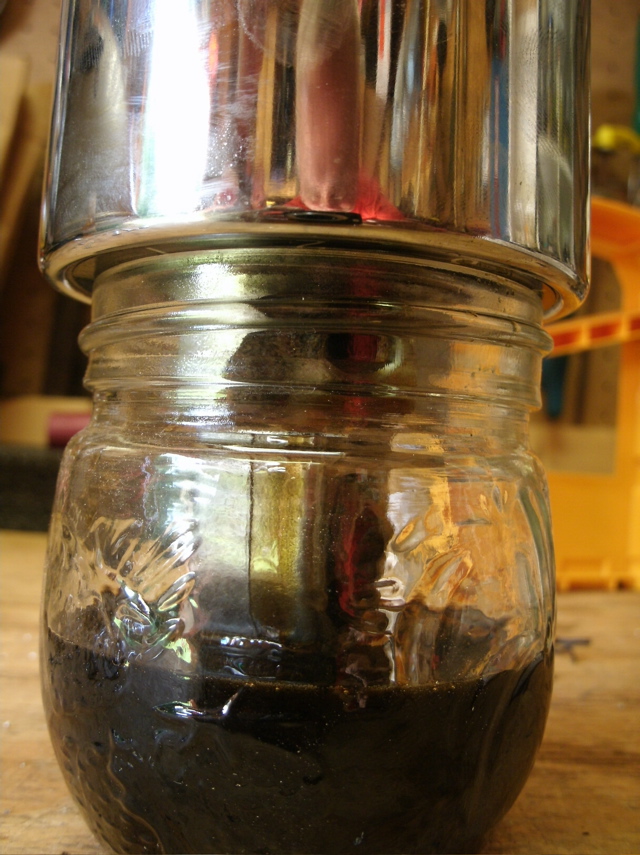
With the spring out of the way, check the shock for smoothness of stroke, closer inspection for leaks and anything else that might cause you concern. Nothing? Good then let's drain them. - WATCH OUT at this step as your shocks still have some pressure in them and likely oil will escape - depressurize the shocks prior to removing the valves. Get your favorite storage container. Jelly jars work great but any container will do. It doesn't even have to be clean. Remove the Schrader valve assembly. Removing the valve and the valve housing will make refilling easier. Tip the shock upside down over your oil catch container and slowly pump the shock to remove the oil - it will shoot out, so have it in your container. It's a good thing to let them sit overnight and allow as much oil drain out as possible.
You can inject a little oil and work the shock to help clean out the inside and then re-drain. This makes sure you've gotten as much of the crud out as you can.
At this point you're wondering to yourself -- self, how much oil is inside the shocks anyway? I used a 60ml syringe to measure and I found that I had pulled 97ml out of the curbside and 93ml out of the roadside. Obviously a little had escaped from the left shock over the miles. We'll fix that.
At this point, I called the folks over at Race Tech Suspension to get some technical help and confidence in what I was doing. These shocks (Showa) are not rebuildable (no seals/parts available) and Race Tech doesn't offer anything for them at this time. However, after speaking with one of their techs, I did gain the confidence in knowing that changing out the oil will likely improve my ride quality, extend the life of the shocks and save me several hundred bucks all while learning a little bit more about my scoot and motorcycles in general. The tech I spoke with also mentioned that pulling around 100mls of oil out sounds "about right" based upon their experience.


Time for re-assembly:
I went with 15w fork oil and 105mls per shock, you choose your weight and if you wish, use the exact same amount you drained from the shocks (or the larger amount of the two). Using 10w will provide a softer ride, 20w will be firmer just like the option with your front forks.
- This will be simpler if you have a helper. One person can work the syringe, dribbling a little oil in while the other SLOWLY pulls the shock out. Essentially you're using suction to draw the oil into the shock. When the shock is fully extended, SLOWLY work it back in. You'll notice that air is bubbling out. Don't look straight into the hole as you'll likely get a shot of oil into your eye. This is a critical point and you need to make sure you have the same amount of oil in both shocks to ensure a smooth ride, so be extra careful and if in doubt, re-drain and start over again.
- Once you've gotten the oil back in and you're satisfied that the exact same amount has been added to both shocks and you've pressed out any excess air, reinstall the Schrader valves and reassemble.
Reassembly is pretty straight forward, just reverse what you did to take them apart. Take a moment with some 0000 steel wool and go over your shock housing and chrome caps. A lot of the road crud will clean off and they'll shine like new again.
If you want to get really anal, you can replace the Schrader valve and o-ring. Part number 16126-1043, gets you the Schrader valve assembly and part number 92055-1130 gets you the o rings - you need two of each.
Once the shocks are back together and all is order, reinstall them onto your scoot. You'll want to clean any Locktite remnants off of the studs and use new some new blue Locktite. Tighten the acorn nuts to 25ft lbs each.
Pressurizing with air is done with the wheels off the ground - this is an important point to remember. I also checked mine 24 hours after filling and found they had dropped a few pounds, I attribute that to the air heating up as it passed through the schrader valve and then cooling down. So I put a little air in each time, rechecked and added more until I was at 38psi. I'm running on the #2 rebound Damping force setting. I can't believe how much better the ride is now and the bottoming issue is gone.
Go ride and enjoy the smoooooothness.


