Shock Pressure Gauge..The Always On Instant Readout
Bob (Sunny) Cooper

Not having much of a patience threshold, by the second time I had checked the rear air shocks on my Nomad, I had decided that there had to be a better way. So I checked Gadgets page and found the Progressive air shock balance kit. Fitted it, and was much happier. For a while!
The balance kit is a "must have". If you don't get one, you are just making hard work for yourself and possibly causing serious problems with your motorcycle's road holding capability. But I just LOVE to look at gauges, and decided to fit one to the shock system. It's quite easy, the hard bit is getting the hydraulic fittings, and it only takes a couple of hours at most. These instructions are for fitting the gauge, assuming you are using the air balance kit at the same time.
What You'll Need
- If shopping in the U.S.
- 2 each -1/8 x 10-32 Elbow push fit

- 1 each - 1/8" plastic push fit "T"
- 1 each - Female 1/8 npt to 1/8" push fit adapter
- 1 each - 0-60 psi air pressure gauge of your choice
- 1 each - Progressive Suspension Shock Balance Kit
- 1 each - Length of 1/8" (not shown in picture) plastic tubing, length determined by gauge placement.
- 1 each - Home made bracket to mount gauge wherever you want
- If shopping in metric countries (which would be everyplace else on the planet):
- 2 each - Swivel elbow M5 to 4mm push fit tube.
- 1 each - 4mm push fit TEE
- 1 each - Female 1/8 npt to 4mm push fit adaptor.
- 1- Length of 4mm air compressor push fit tube, length determined by gauge placement
- 1 each Pressure Gauge 1/8npt (style to suit your preference, but MUST display from zero to 60 psi).
- 1- Bracket you make to fit gauge to wherever you want.


[Gadget Note: All the parts shown in the picture above were readily available at my local True-Value hardwarestore (don't even try this at Lowes or Home Depot) in the section with air compressor accessories and parts. If you can't find the parts locally you will find them online at Valin Corporation. The gauge shown at left is 1" diameter and cost $7.00. The gauge Bob used (photo top of page) is 1.5". The plastic elbows & "T" were about $6 each (pricey little buggers), the adapter $7. There are probably dozens of gauge styles available in different sizes so pick the style that looks and functions best for you. There are many examples on egauges.com. Another online source for parts is Poweraire. You'll find fittings here and gauges here.
How To Do It
- Remove both Schrader valves (the pin in the center of the brass tube) from the shocks, keep them safe as spares, but you won't need them again here.
- Fit the Progressive Suspension air balance adaptors to the shocks. The blanked off one to the left side of the bike. You can unscrew the tiny plastic nipples from the sides, you won't need them. I used a tiny amount of blue silicone gasket sealant on the valve threads to prevent leakage. Tighten these adaptors so the small screw thread is pointing inwards to the battery area. Not too much force, there are O rings inside them which will buckle and leak if squashed too much. Just nip with your fingers, then as much as you need to get the side thread pointing where you want it.

- The hydraulic fittings I used are "swivel elbow" type, so you can carefully screw them into the adaptors while holding the elbow part stationary. Mine had a slightly different thread (metric into AF), but they cut their own thread with no problem in the soft alloy ofthe adaptor. [Gadget note: If you're using the 1/8" x 10-32 elbows shown above they'll thread right into the adapters.] Again, a tiny drop of blue silicone was used. Notice the photo (left) showing the right side shock. The black valve cap is where you will add/remove air from your system. It is placed on the right (up) side of the bike just to make it simpler to reach.

- The black hi-pressure tube just pushes into the elbows, push in, and then gently tug out, and they are sealed (its magic!). BUT, you MUST make a CLEAN SQUARE cut, if it's ragged and angled, you run a big risk of air leakage. Run the tube from one side to the other, using gentle curves. You can tuck it under anywhere you want to. Again stressing, cut the tubing square and rub off any burrs or imperfections. A suggestion: Just use a single piece of tubing between shocks (cut it long) so you can check to be sure all your connections so far are leak free. You'll be able to air up your shocks using your zero loss pump but leave the pump attached so you can watch the gauge. If there's no pressure drop over a half hour or so then you're ready to move on. Release the pressure (at the pump) and cut the crossover tubing to insert your "T" fitting.

- Cut this tube wherever it suits you, to insert the TEE piece. I put mine dead center under the seat.
- Use some more tube to run to wherever you have decided to put your gauge. It can be anywhere you want, even on the handlebars or inside handlebar fairings, under the seat, wherever!
- Use the push fit to 1/8th thread adaptor to convert back to the thread on the rear of your gauge.
- I wanted my gauge to be by the shocks so I made a bracket out of some off cut stainless steel, drilled it for the gauge thread to slot into, and for the bracket to be bolted to the top rear dresser bar bolt.


 |
 |
 |

This system has multiple benefits, and NO drawbacks. I now have only one valve nipple to fill the whole system. I can now check the pressure of the whole system by a simple glance at the gauge. I KNOW that both shocks are ALWAYS at the same pressure. Lastly, the TOTAL amount of air in the system is multiplied by as many as 10 times. That makes the system more stable under varying load conditions.
A word of caution, the factory manual states air pressure MUST NOT EXCEED 43psi, regardless of the load on the bike! Most people find that 20 psi is fine for most uses.
More Options from Gadget
As you were looking at the above you may have been wondering 'what if'. Well as with many of the mods on this site there are many ways to get to the same destination.


Finally, the bracket. Bob is a lot more skilled at metal work than I and was able to use Stainless Steel. My choice was aluminum. It polishes up nicely and is much easier to work with.
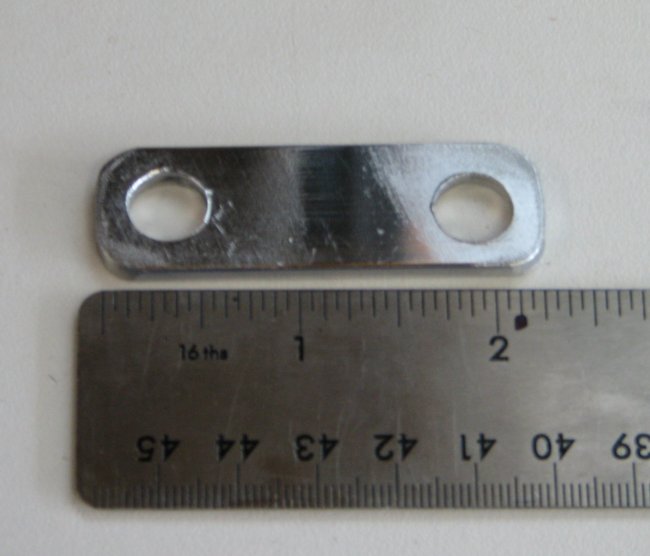
A 2.25" piece of flat stock with 13/32" holes drilled at each end is perfect for the 1" gauge. You might want to go a little longer with a larger gauge.


