Accessory Switch Options
Turn It On, Turn It Up The Easy Way
One of the great things about owning a motorcycle is the ability to customize it. Make it your own. This often involves adding electrical accessories from light bars to amplified speakers, engine lights to alarm systems. Many, probably most of the electrical accessories you'll add require a way to turn them on and off. Some will have their own switches but some, especially light bars, aren't very easy to reach while rolling down the road.
This page will just show a few options for mounting aftermarket switches on your bike. It won't get into relays and circuits. If you've found another spot where a switch is easily installed and can be reached while riding please send me a photo and description.
Before you decide on a switch location you have some other decisions to make. What kind of switch is most suitable, what style and what size are major ones.
There are many switch styles available.
 Mini Toggle |
 Styled Toggle |
 DPDT Toggle |
 Square Push Button |
 Round Push Button |
 Rocker |
 Slide |
 Rotary |
You have tons of other options from aftermarket suppliers. Ricky Stator has a cool one, also bar mounted shown here.
And there are tons of others from places like Pingel
JC Whitney
and more.
The styles you'll use most frequently are toggle types, rocker types and pushbutton types. You just have to choose which is most appropriate. For instance a 'toggle' or 'rocker' switch is usually the choice for lighting. You can tell at a glance whether the switch is on or off. A toggle switch is actuated by the movement of a metal or plastic baton/actuator extending out from the switch body. Toggle switches usually have two or three positions. A rocker switch is an on/off switch that "rocks" when pressed, which means one side of the switch is raised while the other side is depressed much like a rocking horse rocks back and forth.
"Push button" switches are more common when you just need to make a momentary circuit like using the horn although there are both click on/off and momentary type push buttons. Pushbutton switches are extremely versatile and available in a variety of shapes, sizes, current ratings and mounting configurations. They're usually more compact than a toggle type switch.
Slide switches are rare on bikes because they usually aren't very attractive and are hard to protect from weather. Rotary switches are good if you want to use the same switch to provide power to multiple items but not necessarily all at the same time.
Some switches are lighted, some aren't. You probably don't need a lighted switch if you can't see it while riding but you 'might' want the additional warning that an accessory is turned on if you're controlling something you can't see like an amplifier.
There are many switch 'types' available
If all you want to do is turn something on or off then a single pole single throw (spst)  type switch is what you need. Using a toggle as an example flipping the switch one direction is off, the other is on.
  The bottom of the switch just has two posts to attach wires to. Simple.
Another type is the Single Pole Double Throw (SPDT shown at right) used to power two items from the same switch. Notice there are three posts on this switch. (A) and ( are connected to the accessory while (com) is the common 12 volt + wire from the battery or accessory connector. This switch would be good for alternating between two accessories but power will usually have to come from a switched source since there is no 'off' position.
There are many other switch types we won't get into that here but you will want to use the proper type for your application. Wikipedia has a good page showing the various types here.
There are many switch 'sizes' available
In this case I'm talking physical size. Among toggle switches there are standard, mini, submini and micromini. On a bike you usually want to use the smallest switch you can but still be able to use it with gloves on. Some of that consideration will involve the location of the switch. If it's up on your handlebars where you can see it then a micromini switch might be perfect. If it's on a side cover where you have to use your sense of feel a little then a larger switch is usually suggested.
There are many switch 'power ratings' available
Most of the mini sized switches are rated for 3 amps or less while larger switches might be rated for 5 or even 10 amps. You'll need to know the power draw of the accessory you'll use the switch with to determine the rating (and so often the physical size) you'll need. Never use a switch rated for less than the amperage draw of your accessory.You will melt the switch which at the very least could prevent you from operating your accessory or at most start a fire.
If you only have space or desire for a small 3 amp switch but have an 8 amp accessory, spotlights would be an example, you can use a relay. The small switch will only have to carry the tiny amount of current necessary to latch the relay while another circuit handles the big power chore. You can see an example of this on the 'how to wire up spotlights' page here.
Where to put the switch
Ya thought I'd never get around to this eh? You've determined the size, type, style and power rating you need for your switch, now to find a suitable location. Ideally you can reach your switch while riding so that pretty much means left side of the bike so you can keep the throttle hand where it belongs.

 If you can use a micro or submini switch then your existing switch box just might be the perfect place. On a Vulcan 1500/1600 the rear section of the left switch housing is large and empty with space on top for two micro or one submini switch(es). Installation is just a matter of drilling a proper size hole in the top of the aluminum piece, insert your (already wired) switch and run your wires out of the switch box via the same exit as the OEM wiring. If you're using a small gauge wire it's easy to fish your new wire through the existing harness and it'll be invisible. Larger wiring you'll probably want to cover with shrink tubing and attach to the outside of the OEM harness.
; Another location for switches is the left side cover. There is lots of space on top of the cover and at the rear. Access to your bikes accessory wiring and the battery is also very close. A little planning ahead would be good. How many switches might you eventually add to the top of the cover and can you tell which is which when you reach down with gloved hands to turn something on or off? In this case the photo shows two weather protected toggle switches. One (red) is for the emergency flashers, the other (black) powers the LED's located around the bike for show lighting. Notice the switches are spaced far enough apart so a gloved finger can be inserted between them. In this case accidentally turning on the show lighting while trying to turn on the flashers wouldn't be a bad thing but turning on the hazard lighting while trying to turn on the show lights would so plan accordingly. The 'push' button at the rear of the cover is a momentary contact switch connected to a garage door opener stashed under the cover.
 Here's another interesting location supplied by Sam Hartung.
He drilled into the rear of the triple tree which made a nice easy wire run into the headlight bucket and the two switches are easy to reach while riding. Note this can only be done on bikes that have a hollow underside to the casting like the Vulcan 1500 Nomad/Classic. With a solid tree this probably wouldn't be too practical.

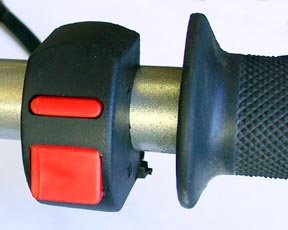
 InkDog installed a lighted rocker switch in the front of his left side cover (don't let the relocated choke knob throw you off) for the amplifier he uses with his MP3 player. The lighted switch provides a reminder that the power is on when he parks the bike.
TG put one under the left edge of his fairing liner (photo right) so it's hidden and protected from weather.
 > >1 |
 2 |
 3 |
 4 |
The collection above comes from Jax.
#1 is a garage door opener button. His is on the right side frame cover because his driveway slopes down and he can coast with the clutch pulled in while pushing the button. Pick the side that works best for your situation. How to add a garage door opener to your bike is covered on this Gadget page.
#2 handy locations for powering all kinds of accessories. Be VERY careful drilling the tin behind the fork. The last thing you want to do is punch a hole in that fairly expensive and important part.
#3 this is an 800 with toggles mounted in the instrument cluster surround.
#4 the 800 again with a toggle mounted in the fender trim
 If you only have a couple of accessory switches and use them frequently then maybe you would choose Scott Harns' solution. You can use a simple piece of aluminum angle iron (if you don't mind seeing the switches from the front) or form a simple aluminum box, a couple of machine screws attach the bracket to your existing switch housing. Fish the switch wiring up through the OEM switch housing and out through the existing wire harness.
So, there you have it, a few examples of where to place various switch types. Just be sure you protect the switch from weather and try to get good quality switch gear. The best is military grade, next best is from a boat store or marine supply. Your last ditch option should be a chain type electronics supply store.