Home Made Open Air Intake For $20? Yep!
The Woody - A Power Boost For Your Carbed or Injected 1500/1600 Vulcan
.... Without The Boosted Price of Commercial Kits
Thanks For This Creative Solution and Photos from Thomas J. Daluisio aka Woodjust4u
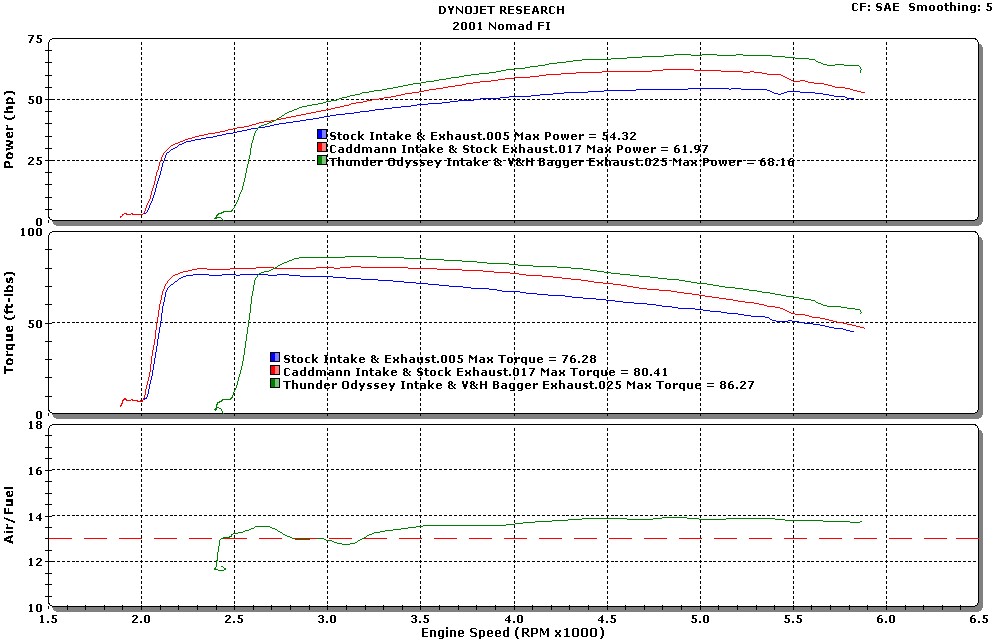
Does a modified intake work? This is a Dyno chart for a '01 Nomad FI with over 50,000 miles on it.

- Run 05 is stock intake and mostly stock exhaust (bypass pipe in place of goat belly)
Run 017 is Caddmann intake and mostly stock exhaust
Run 025 is Thunder Odyssey Intake and V&H Bagger exhaust
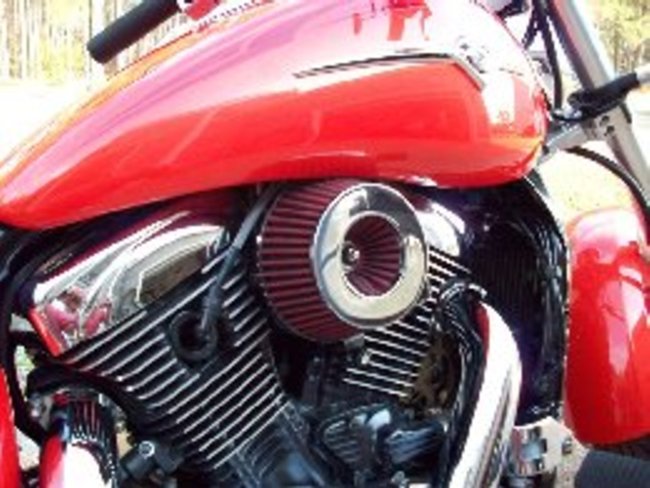
This open air intake is a combination of the Caddmann mod and commercial air kits like those from Thunder and Barons. It uses an aftermarket automotive air cleaner like the Caddmann but gets rid of the stock air box backing plate, crossover tube and left side air filter like the pricey kits. If you like the look (photo top of page) then read on!
What You'll Need

- APC part #151410 (white) 151411 (red) 151412 (blue). The filter is available from many large auto supply stores such as Autozone, Pep Boys and Advance Auto Parts for about $20.
- A piece of flat aluminum to make a circle approx. 6" in diameter.
- A few inches of "all-thread", a threaded rod available at any hardware store along with appropriate size/pitch nuts and washers. You'll save yourself some time and trouble if you get the same size/thread/pitch as the OEM air box cover bolt but if all you can find is SAE thread you can always re-tap the hole.
- (3) Standard hex nuts to fit the all-thread and (1) cap nut or decorative nut of your choice
- A can of spray glue or paste
- Blue Locktite or other thread locker
- Roll of 3/16x3/8" high density foam weather seal (glue on one side used to seal household doors).
How To Do It
For reference, I'll be using the term 'throttle body' through this page but the intake will work just as well and pretty much the same with a carbed Vulcan, you can just ignore the temperature sensor, vacuum tube and cold idle solenoid instructions.
You actually have a choice here, you can remove the entire air cleaner assembly and backing plate from the left side of the bike or you can leave it in place. It won't have any function when you're finished. You can also leave the plastic tunnel that carries air from the stock filter to the air box on the right side of the bike or remove it. As with the filter on the left side the tunnel will have no function which is why aftermarket manufacturers tell you to remove it but (except maybe rattling a little) there's no harm leaving it in place if, someday, you think you might want to go back to a stock intake.
In addition to those bits and pieces you'll also be removing the cold idle solenoids and (if you choose) the metal tubes they're connected to. If you remove the tubes be sure to plug the ports they're connected to on the throttle body. For more information on that see the Caddmann link above or check this Gadget page showing how to install an aftermarket air cleaner and TFI.
1. Remove the right air box cover and backing plate being careful not to break any wires when removing the (brass) air temperature sensor. If you've chosen to remove the stock air cleaner then this is the time to remove that along with the


2. Now that you have all the extra parts out of the way it's time to actually install your new intake. You're going to start by making your own backing plate (a part that can cost $100 from aftermarket suppliers). As shown in the picture (right) grab a piece of paper and use a small amount of spray glue on one side. Stick the paper to the throttle body intake and, just like you probably did in first grade, use the side of a pencil to darken the paper. This will show you exactly where you'll need to drill holes for the intake, bolts and (if you've kept them) the metal tubes the cold idle solenoids were once connected to. Once you have your tracing, remove the paper.

3. Now transfer the paper to a thin piece of aluminum. In Wood's case the aluminum came from an old stop sign. Your finished plate will be 5 7/8" in diameter. From the top of the plate to the center is 2-7/8". Note the center hole is slightly off center so the plate and filter will clear the bottom of the gas tank. The mounting holes are 5/16" (a little larger than necessary so you can move the plate around a bit if necessary).

Notice the air temperature sensor and crankcase vent hose also have appropriate size holes drilled. The rivets shown are holding the idle adjustment cable bracket (removed from the OEM backing plate).
In the photo at right you'll see a piece of "allthread" which runs through the plate and into the hole on the throttle body originally used by the air box cover. Secure the allthread with a drop or two of blue Locktite. Three nuts are used as shown, one to help secure the backing plate, one for the 'inside' of the filter, one on the outside, adjusted as necessary so the filter seats properly.
4. Once you have your backing plate made and test fitted you'll need to seal it. Use the weather seal between the throttle body and your backing plate, also between the backing plate and filter as shown at left. Notice the two relief notches in the outer rim of the filter? Those are necessary to clear the OEM hex head bolts used to hold the backing plate in place. If you use new flat head bolts the relief cuts won't be necessary.
5. Install your air temperature sensor and crankcase vent hose, put the backing plate on the throttle body then add your new air cleaner adjusting the inner and outer nuts as necessary. Use a nice chrome or other decorative nut on top of the outer hex nut and you're finished!
You now have a very simple and unique intake that will flow as much air as the $200-$300 commercial units. Go ride!
Tag: intake


