Light The Rear Of Your Nomad With An LED Strip
Light it up, Waaay Up!
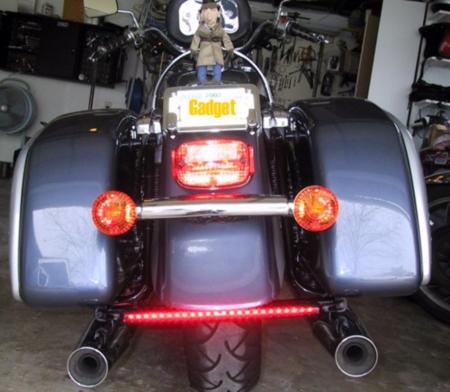
Another Way To Light The Rear Of Your 1500* Nomad With Energy Saving LED's
From Gadget

On a whim, I purchased a "Pilot" brand LED strip light (model WE6-197) from an Autozone automotive parts store. It appeared to be about the right width to fit under the Nomad's rear fender on that support bar that runs sideways. I could hardly believe it when I held the part up and the brackets on the light bar matched exactly with the bolts that hold the bar on. The part is no longer available off the shelf in Autozone stores but they will special order it for you or it's available for order via Autozone's website.
If you like the look (see photo below) here's the engineering you'll need to do (big word for no serious work in this case). Note this product is intended to be used inside a car. If you ride in the rain you'll probably want to use a little silicone sealant at the wire opening to keep moisture out. If you can handle a soldering iron and would like to install the strip so it flashes when you apply the brakes here's how you do it.
- Remove your bags and pull one of the Allen head bolts holding the crosswise support bar on.
- Find two bolts with the same thread but about an inch longer than the bolt you just removed. You can use a 55mm Allen head bolt with the appropriate thread which will make things easy. If you have a substantial nut/bolt collection and can find a standard bolt that's long enough with the right thread go to step 3. If you use the Allen head bolt go to step 5.
- With a grinder or your handy dandy Dremel tool, grind the edges off the head of your new longer bolt (because you won't be able to get a socket where you need it to tighten the bolts).
- With your Dremel or a hacksaw cut a slot in the top of the bolt head you've rounded off. The slot has to be deep enough to accommodate a screwdriver. (see where I'm going here?)
- There are plastic caps (brackets) on the ends of the light bar. Drill these out to match the diameter of your bag frame support bolt then, with a hacksaw or Dremel cutting wheel cut them in half so they are half the original depth.
- Pass your new bolts through the light bar bracket, through the plastic cap (it's needed for clearance), through the crossbar hole and put a drop of blue locktite on the threads. Now screw it onto your bike. No muss, no fuss eh?
- Wire the light bar either into your running light or brake light circuit or use the link above to create a simple circuit and connect to both so the LED's will operate both as running and brake lights.
- Use black zip ties to tidy up wiring and make sure the tire won't rub.
- Turn on the key.
*Special note for Nomad 1600 owners: The horizontal bar is longer and bag supports further apart on your bike than on the 1500 so the LED strip won't be a perfect fit for you as it is with the 1500. You can make the strip work but you'll have to fabricate a slightly different bracket rather than using the parts supplied with the strip.
Cheers
Gadget
LED Flash!

The purpose of this circuit is to supply a lower voltage to the LED's (about 8) in "normal" running mode. A 330 ohm resistor is used to drop the voltage so the lights are a bit dimmer. When the brake is applied, the circuit allows a full 12 volts to reach the LED strip for full brightness.
As shown you will need:
- a bit of wire about the size of the wire supplied with your LED strip (about 20 gauge.
- 2-4003 Diodes which provide a power gate so the 8 v doesn't make its way to the 12 volt brake light circuit and the 12 volt brake light power doesn't get into your running light circuit.
- 1-330 ohm resistor
Make sure the diode is downstream from the resistor on that "blue" leg.
All of this can take the space of a quarter. The parts and wiring needed is very small. Legs of the "Y" need only be long enough to reach the appropriate wires under your seat.
By popular request, below is a photo of the actual circuit. Note the whole thing is about an inch across (less if you want to tighten things up a little more than I did here).
 This photo mimics the circuit drawing shown above. The top leg (left) contains both a resistor and diode (note orientation of diode with silver stripe to right). This is the 'running' light side. The lower leg is the 'brake' side and contains only a diode. Wire to the right connects to the hot wire of the LED strip |
 Same circuit with two legs individually shrink tubed and then a larger shrink tube over the entire circuit |
Tag: nomad lighting


