Upgrade Your Headlight Bulb to 100 Watts on High Beam
Install a Brighter Headlight Bulb
One of the most common complaints from motorcyclists is night visibility. Owners of Vulcan FI's with their "computer designed" lenses are especially vocal about the sharp cutoff about 20 feet in front of the bike. There's an inexpensive solution... Replace the bulb!
Your stock H4 headlight bulb is 55 watts on low beam, 60 on high. There are a couple of 'better lighting' solutions one involves increasing the bulbs output the other changes the bulbs color. Both will provide vastly improved illumination of the road ahead.
2019 Update:
There are many choices of plug-and-play LED headlight bulbs which are brighter and whiter, and which don't draw the additional power of an incandescent bulb. Gadget currently runs this one, but there are many choices.
The More Power Option
Visit your local Napa store and, in the headlight bulb area look for an H4 bulb stock number BP1210/H4 . The bulb is made by (or marketed by anyway) Wagner. Note this bulb is rated at 80 watts on low beam and 100 on high. When I first started using this bulb it was marked on the packaging "for off road use only" but current packaging (left) says it is original equipment replacement. That little note could get you out of a citation so make note of it.
Before we get to work a reminder (because this little glitch has caught at least one person off guard). Do NOT do this if you have a light bar connected to your headlight circuit. The additional amperage will be too great for your stock 10 amp fuse and you will lose all your front lighting at some point. Before adding the higher powered bulb make sure your extra lighting is on its own circuit.
The Color Change Option
Sylvania is now offering a 'motorcycle rated' version of its Silverstar H4 labeled "ST". This is a 45/65 watt bulb (note it's slightly lower wattage on low beam and slightly higher on high beam than stock).
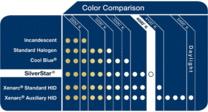
Your stock H4 bulb has a color rating of about 3200 K which is more yellow than white (see chart at right). The Silverstar bulb is rated at 4000 K which is much whiter and just a step below the number for HID lighting.
Those who've tried this bulb report far better visibility than with the stock bulb. If there is a downside it's only that your headlight will be bright white while your spotlights (if you have them) will still be on the yellow side of the color scale. If you have an H3 bulb capable spotlight Sylvania sells a 4000 K bulb that will match the headlight color. Browse the web for best pricing.
How to do it
So, you've made your choice and have your brand new bulb? Now lets pop it in.
- Place a towel or other soft covering on your front fender (we don't want any scratches or dents here)
- Remove the two Phillips screws holding the front headlight ring onto the rest of the housing.
- If you have a Mean Streak, you'll also need to remove the two bolts securing the turn signals and move them out of the way.
- Lift the ring at the bottom then lift up and pull away slightly Woo Hoo, look at all those wires!
- The headlight bulb is connected with a three pronged connector. Wiggle the connector loose with one hand while holding the lens assembly (firmly) with the other.
- Now that you have the lens assembly (and bulb) loose, remove the rubber weather/dust seal and (under the seal) remove or loosen the screw holding the spring clip. Remove (or fold back) the spring clip and lift out your stock bulb. If it's still working fine, place the old bulb someplace safe. You never know when it might come in handy. (It's Sunday afternoon, all the bike shops are closed, your headlight just went south and you have a night ride scheduled)
- Without touching the bulb itself, remove your new H4 from its packaging. Oils from your fingers will substantially shorten the bulbs life if you touch it. I like to clean even a brand new bulb with a paper towel and rubbing alcohol before installation just to be certain there are no contaminants.
- Insert your new bulb paying attention to where the little 'outriggers' fit in their respective slots (yes, for some reason there's an 'up' and a 'down' with these bulbs)
- Re-install the rubber boot noting there's an 'up' side to this too.
- Plug in your new bulb, hang the lens ring off the top of your headlight housing and press back on the bottom to align the tabs (on the ring) with screw holes in the housing.
- Re-install the two screws
- Gentlemen (and ladies) start your engines! Or at least burp the starter so your headlight will come on. Test to be sure you have both high and low beams working.
- Go for a ride at night. You're going to be amazed at the difference.


