The Vulcan FI Fuel System
What's Been Making Those Whirring, Bubbling and Gargling Noises...
We won't be dealing with the carbed fuel system here because, well heck, it's just a tank of gas, a petcock, a hose and a carburetor. If you can tinker with a model "T" you can figure that one out.
The fuel injected bikes are a whole different animal and a whole lot of explanation can be taken care of with some photos scanned from the FI maintenance manual.
Click the thumbnails for a much larger image. Caution, dial up connections might take awhile to load these images.
 This is the system used on FI bikes with the 4.2 gallon tank The biggest difference is the external fuel filter (item 11) |
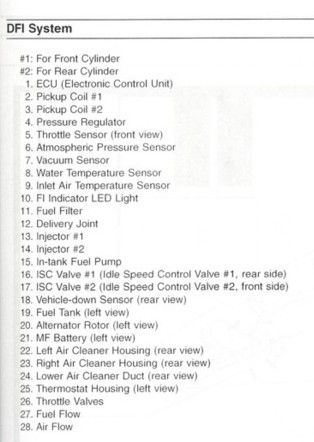 This chart will provide names for the numbered items in the graphic |
 This is the system used with the 5 gallon and 5.3 gallon tank. Note the fuel filter (item 11) is now inside the tank. |
 Chart for numbered items in picture to left |
Placing the fuel filter inside the tank makes for a little extra work if you ever have to replace it but made under the seat packaging a little simpler and allows for a larger (amp hour) battery.
Note how everything ties into the ECU (#1) from engine timing to coolant temperature, altitude sensor and throttle position sensor to the (hope you never have to use it) tip over switch. Fortunately the system is pretty robust and causes very little in the way of trouble.

Pulling The Codes
Just like the computer in your car, the computer on your Vulcan stores trouble codes. It seems some dealers don't know this so if you're having engine problems and the FI light has come on and you don't feel comfortable doing this yourself, print the instructions and take them to your favorite wrench.
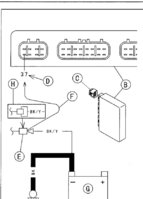
The following is straight out of the Kawasaki Nomad Maintenance manual (sans diagrams where I have put comments in parenthesis). The ECU is hiding under the seat or right side cover (depending on bike model) and has three plugs going into it.
- Turn ignition switch OFF
- Connect (ground) the ECU terminal number 37 to the battery (-) terminal Note on 1600 bikes terminal 37 already has a yellow wire connected to it. Just ground the wire.
- Turn ignition switch ON and self diagnosis mode starts.
- On 1500 bikes the FI indicator LED light blinks to display the fault code. On 1600 bikes do the following:
- Turn the ignition switch on.
- Push the mode button and display the odometer meter.
- Push the reset button for more than 2 seconds... the LCD FI characters are displayed.
- Count the blinks of the LED light to read the service code.
- Locate the problem with the fault code table (see below) and check and repair DFI or ignition system according to the description adjacent to the code.
- Remove the wire, ending the self diagnosis mode.
- Make sure the indicator LED light doesn't go ON. If it does go back to #1.
- If ok then run the engine for several minutes at idle and run the motorcycle to 18 mph or above to confirm no problem. (if there is go back to #1)

How to Read Fault Codes
Fault codes are shown by a series of long and short blinks of the FI indicator LED light.
Read the 10th digit and unit digit as the FI indicator LED blinks (an example of this would be code 12 blinking as a long then a pause and two shorts. Code 15 would blink as a long and five shorts etc.
When there are a number of problems, all the fault codes can be stored and the display will begin starting from the lowest number fault code in the numerical order. After completing all codes, the display is repeated until the ignition switch is turned OFF. (example as the above you could get a long/pause/short/short (12) /pause/long/short/short/short/short/short (15) indicating there are two faults.
Example, if four problems occurred in the order of 31, 15, 41, 12 the fault codes are displayed from the lowest number in the order listed.
If there is no problem or when the repair has been done no fault code is shown
 Trouble Codes |
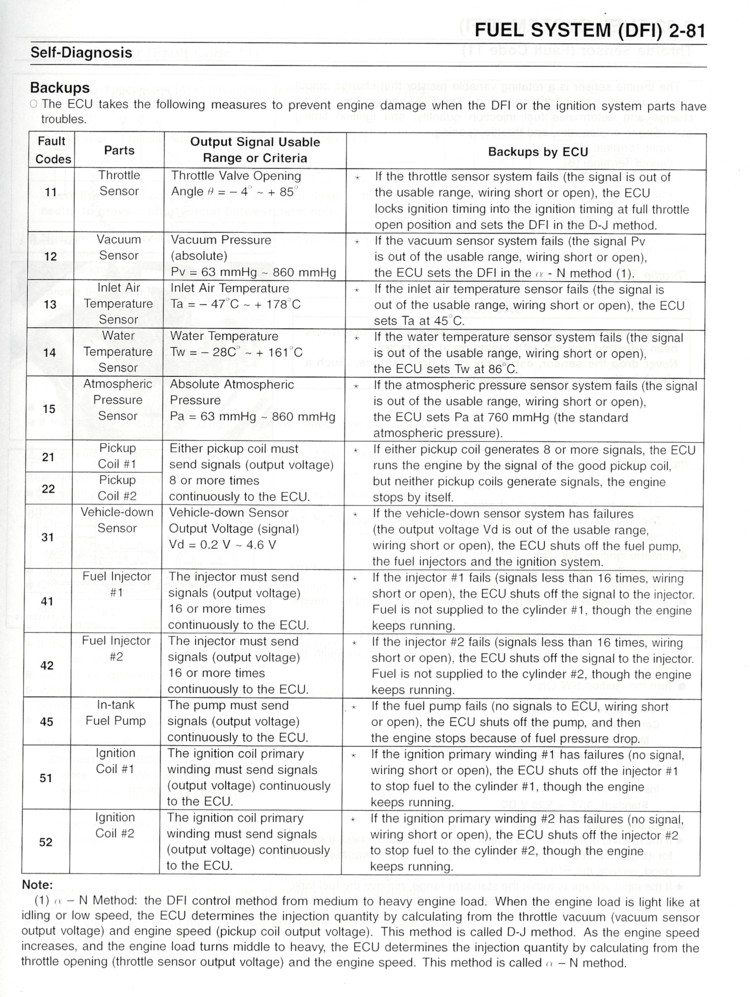 How the ECU will protect itself or help you get home if there is a problem |
Anything more complicated than this you'll want to get yourself a factory maintenance manual. Manuals for the FI bikes are available through your dealer, direct from Kawasaki or from of several online sites which might save you some money.


