Center Stand For Easy Maintenance, Buy It or Make It
The V-Lift
 There was a time there were nearly as many motorcycles produced with center stands as with side stands. The center stand is just so practical for washing, oil changing and level checking, tire pressure checking, airing up the shocks... well, you probably have your own list. Unfortunately over the years manufacturers have produced fewer and fewer bikes with center stands and that includes the Kawasaki Vulcan.
Many have tried to fill the gap with various kinds of levers but you've never seen a center stand like the one Phil Pratt built. The "V-Lift" provides all the benefits of a permanently attached center stand but you don't have to carry the additional weight or deal with the frequent rattling and reduced ground clearance of a permanently attached center stand.
For starters, take a look at his demonstration video. The "V-Lift" is attached to the Vulcan using pins that slip through the holes in tabs at the rear (bottom) of the frame. Easy to attach, easy to detach and it works for all Vulcan Classic, Nomad, Meanstreak and Drifter 1500/1600 motorcycles with tabs hanging from the rear lower part of the frame (see drawing below) and spaced 9.25-10.25" apart.
Click Here For The Video (this is a windows media file)
Photos shown below are of an unpainted V-Lift. Most parts of the production version are painted red.
 The Parts |
 In The Air |
 Front View Mounted On Bike |
 Rear View Mounted On Bike |
 Rear Tire Off The Ground |
 Front Tire Off The Ground |
 Reference |
Click Here To See The Operating Instructions Provided With The V-Lift (pdf file) |  Reference |
Impressed? If this looks like something you can use there are two options:
- Check E-Bay. Phil has stopped making the V-Lift to order but says he 'might' offer them on E-Bay when he has time to make them.
- Build (or have built) your own V-Lift using the instructions below. Note, if you or a friend/neighbor don't have welding equipment you can always take the plans to a welding shop and have them make the V-Lift for you.
What You'll Need
-
Misc. Pins Primer Paint
-
Approx. 36" of 1-1/4" x .100 Thickness HSST Square
-
Approx. 48" of 1" x .100 Thicknes HSST Square tubing
-
3" x 1-1/4" Tube
-
3/4" Pipe
-
5/8" Rod
-
3/4" Thin tubing
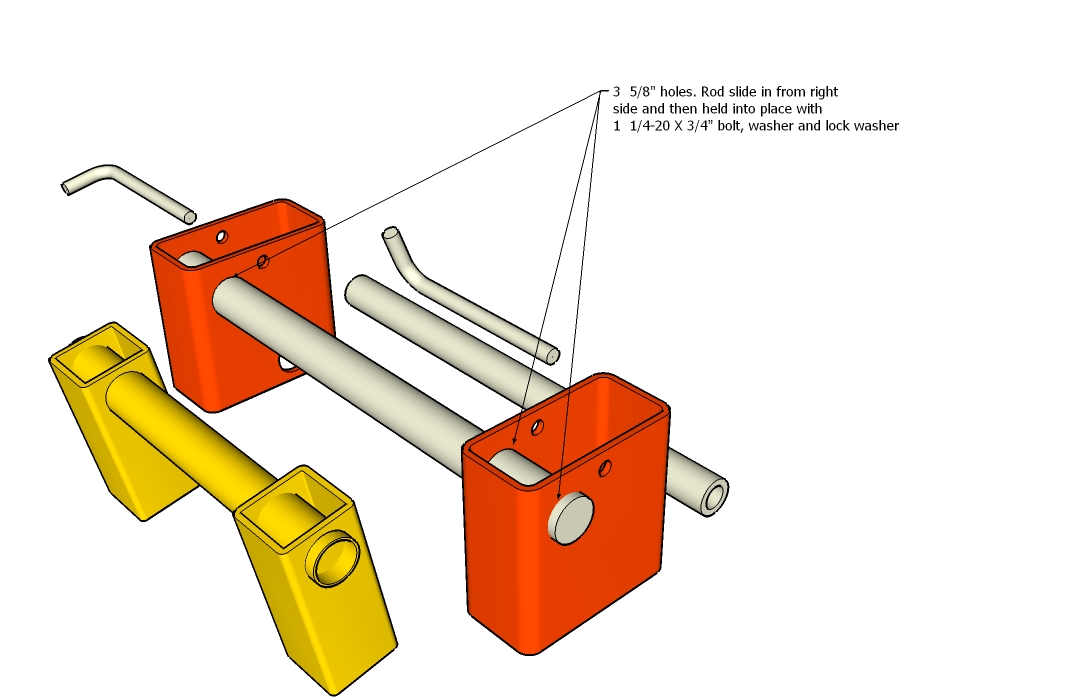
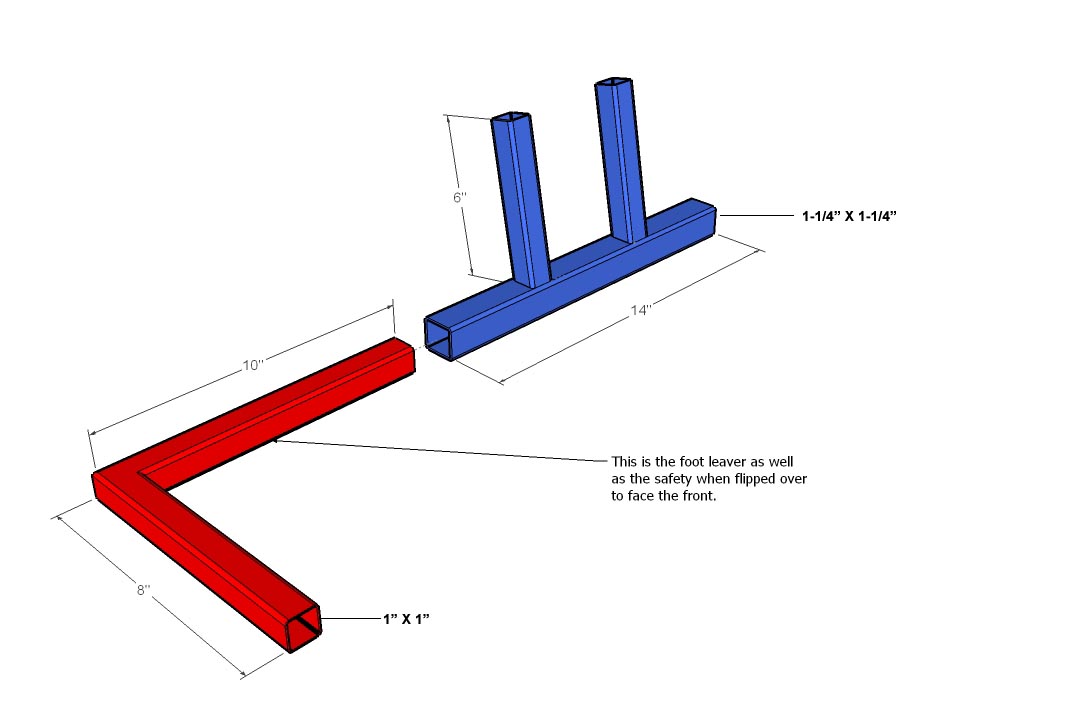
How To Build It
You can view the individual pictures below by clicking on each to get a larger version or download the pdf file which will make it simpler to print. This link will give you a full size version of the template shown at bottom right in PDF format.
Important! When printing the template in Adobe reader be sure to set page scaling in the print menu to none. This will allow it to print to scale. Once printed check to see if the squares are 3" X 3". If they are not then all the dimensions are off and it will not work.
 |
 |
 |
 |
 |
 |
 |
Notes: The V-Lift attaches to the tabs at the bottom rear of the Vulcan Frame. Some of these tabs are pre-drilled at the factory, some are not. You will need a 1/4" hole in each tab. The template at right is for guidance only. Use the pdf file above for an actual size pattern |
 |
Tips & Tricks
A couple of things that will make the V-Lift even easier to use.
- Always use the lift on level ground. It might 'seem' like lifting the bike would be easier if the rear end was pointed downhill but it isn't and can make pushing the bike off the lift (uphill) more difficult.
- If you'll be changing oil, put a drain pan under your oil filter and remove/replace the filter before attaching the V-Lift. You can do this with the bike on the lift but you'll have oil dribbling down all over the lift (just like it does on a big hydraulic bike lift) and you'll have a mess to clean up. It's much simpler just to change the oil filter with the bike on its side stand then use your choice of drains to get oil out of the crankcase with the bike up on the V-Lift.
- If you have a Nomad, use the dresser bar on the left side to help lift the bike. Lift with your right hand on the bar while you're pushing down on the lever with your foot and the bike will pop right up even on the tall stand.
 If you're weight challenged and find lifting the bike on the tall stand difficult, add an extension as shown at right. A piece of 3/4" square steel tube will fit right into the larger tubing used for the stand and will give you substantially more leverage. A set screw will keep the extension from sliding out. The extension shown is 5.5" which allows for clearance with the Nomad dresser bars.